After you logged into your admin account, click on Merchant Setup link from the menu:
On the Merchant Setup page you will view all the available merchants installed into your platform. If you want to change the merchant details you will need to click on edit button:
1. Enter here the item that you want to search
2. From this drop-down menu you can select where you want to search
3. Click here to search for the desired item
4. Click here to reset the search items
5. Here you can view the status of the merchant
6. Here you can view the name of the merchant. By clicking on the name you may edit the merchant details
7. Here you can view the user that installed the merchant
8. Here you can view the date when the merchant was installed
9. Click here to edit the merchant details
10. Here you can see the pagination index, the number of records found and you cans elect how many items you want to see displayed on the page
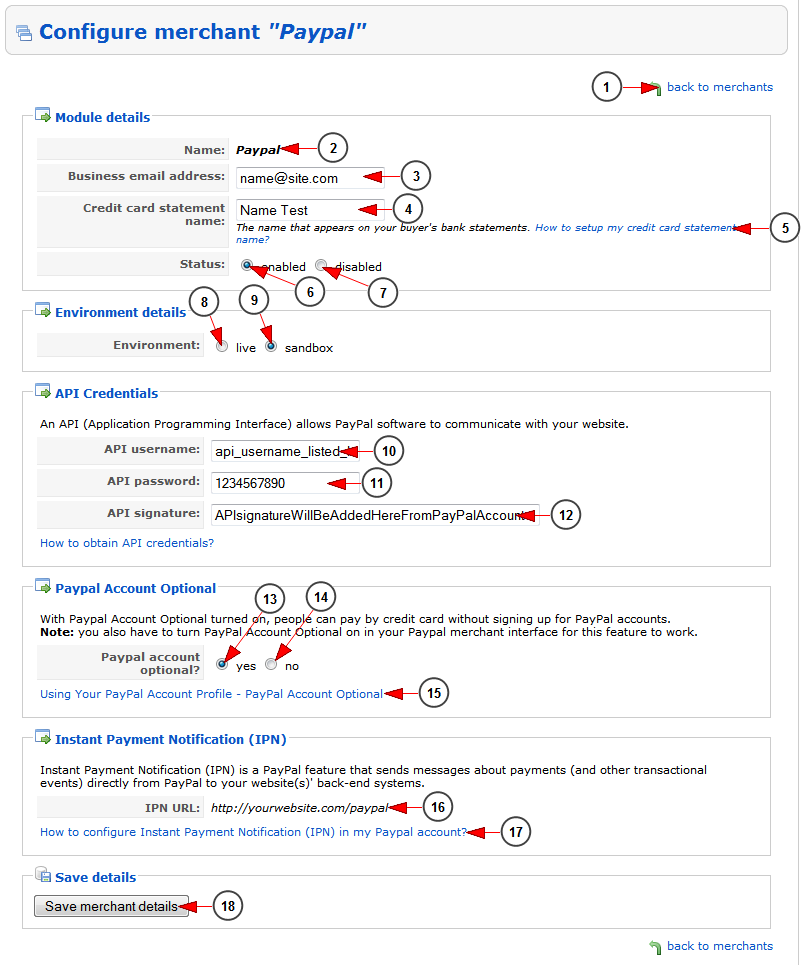
Edit Merchant details
Note: below we posted and example on how to configure the merchant details using PayPal merchant. This page may look different depending on the merchant used
1. Click here to go back to merchants list
2. Here you can view the name of the merchant that you are editing
3. Here you can view and edit the business email address
4. Here you can view and edit the name that appears in buyer’s bank statements
5. Click here to access PayPal page and view how to setup the credit card statement name
6. Check this radio button if you want to enable the merchant module
7. Check this radio button if you want to disable the merchant module
8. Check this radio button if you want to enable the merchant on live environment
9. Check this radio button if you want to enable the merchant on sandbox environment – this is used for testing the merchant on your website
10. Enter here the username of PayPal API (Application Programming Interface)
11. Enter here the password of PayPal API (Application Programming Interface)
12. Enter here the signature of PayPal API (Application Programming Interface)
13. Check this radio button to turn On the PayPal account optional. When PayPal account optional is set to YES on PayPal interface user has 2 options:
- Have a PayPal account
- Pay with Bill Me Later®, Debit or Credit Card
Note: When this feature is turned on, your customers will go through an optimized checkout experience. This feature is available only for BUY NOW, and NOT for RECURRING SUBSCRIPTIONS. For Recurring Subscriptions, transactions can be made only through a PayPal account.
14. Check this radio button to turn Off the PayPal account optional. When PayPal account optional is set to NO on PayPal interface user has 2 options:
- Have a PayPal account
- Create a PayPal account
Note: With PayPal Account Optional turned on, people can pay by credit card without signing up for PayPal accounts. You also have to turn PayPal Account Optional on in your PayPal merchant interface for this feature to work.
15. Click here to access the PayPal page that details the PayPal Account Optional details
16. Here you can view the IPN (Instant Payment Notification) URL
Note: IPN configuration is mandatory for all recurring payments
17. Click here to access PayPal page and view how to configure IPN on your PayPal account
18. Click here to save the merchant details


