Note: this page is related to PayPerView optional module.
If you click on the Channel Income Reports from the Edit Channel page, you will be able to see the PayPerView income reports for that channel:
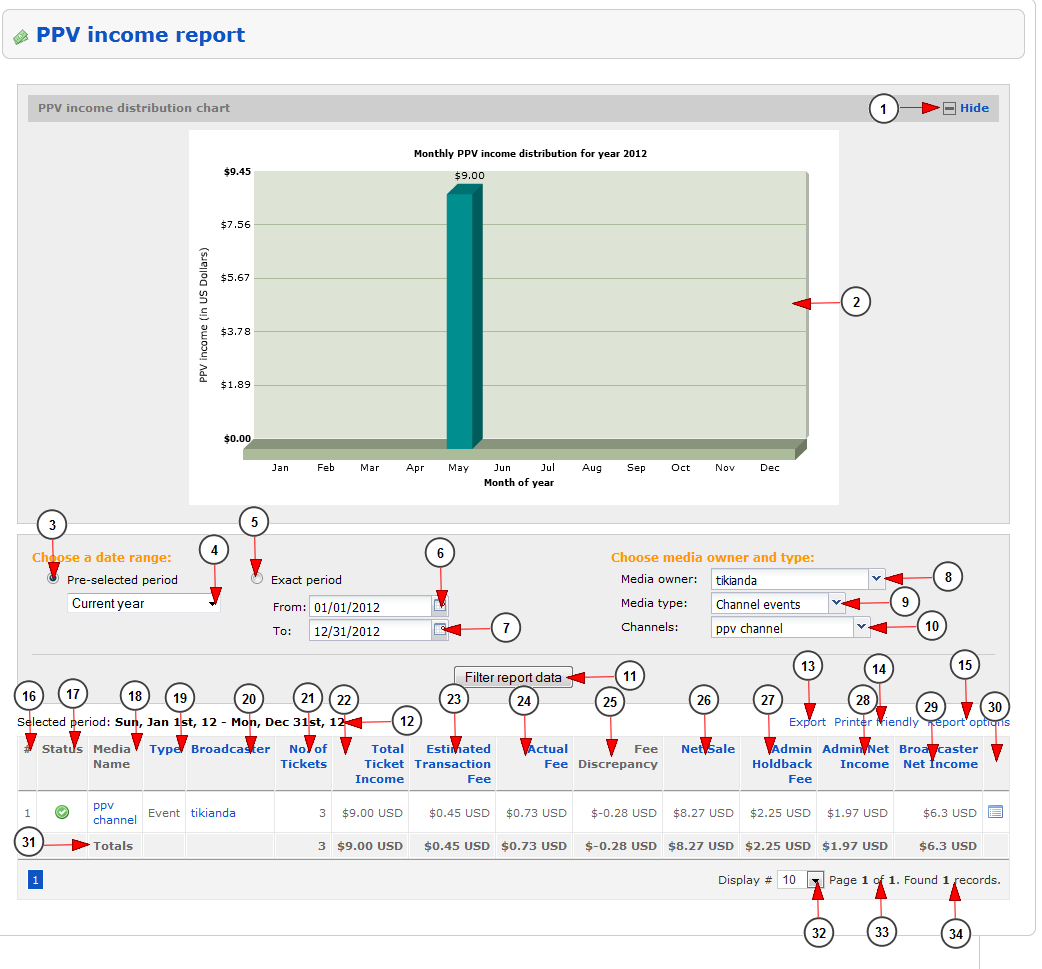
1. Click here to show/hide the PPV Income distribution chart.
2. Here you can view the daily PPV income bar graph for the selected period of time.
3. Check this radio button if you want to view the report for a pre-selected period of time.
4. From this drop-down you can select the pre-selected period of time for which you want to view the report.
5. Check this radio button if you want to view the report for an exact period of time.
6. Click here to open the calendar and select the start date for reports.
7. Click here to open the calendar and select the end date for reports.
8. From this drop-down menu you can select the owner of the media for which you want to view the reports.
9. From this drop-down menu you can select the media type for which you want to view the reports: channels or videos.
10. From this drop-down menu you can select the channel for which you want to view the reports. If you have selected on point 9 the media type as videos, then on this drop-down will be listed all videos that the media owner has into the system.
11. Click here to view the reports for the selected period of time.
12. Here you can view the period of time for which the reports are listed.
13. Click here to export the report into a CSV file format.
14. Click here to view the print format of the report – it will be opened into a pop-up window.
15. Click here to adjust the report options.
16. Here you can see the listing number of the media file.
17. Here you can view the status of the media.
18. Here you can view the name of the media.
19. Here you can view the type of the media.
20. Here you can view the name of the broadcaster that owns the media; by clicking on it you can edit the user account.
21. Here you can view the number of tickets that were bought for this media.
22. Here you can view the total income for the event.
23. Here you can view the estimated transaction fee that the system takes for the transactions.
24. Here you can view the actual transaction fee that the system takes for the transactions.
25. Here you can view the fee discrepancy between the estimated and the actual fee.
Note: Fee represents the sum of the amount earned by Admin based on percentage set in Site Settings and Merchant (PayPal) fees.
26. Here you can view the net sale for the event.
27. Here you can view admin holdback fee.
28. Here you can view admin net income.
29. Here you can view broadcaster’s net income.
30. Click here to see associated tickets.
31. Here you can see the total sums for all events.
32. From this drop-down menu you can select how many media will be listed on page.
33. Here you can see the number of the listed page.
34. Here you can see the number of records found for your search.
Calendar
If you click on the calendar icon, the pop-up calendar will open and you will be able to select the date.
1. Click here to view the month and year part and select the desired month and year.
2. Click here to go to previous month.
3. Click here to go to next month.
4. Click here to go to current day.
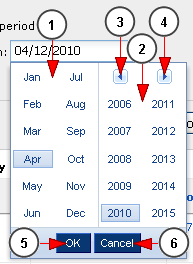
If you click on the arrow from previous point 1 (the arrow near year), you will be able to select the month and the year for the reports period:
1. From here you can select the month.
2. From here you can select the year.
3. Click here to view the years before 2006.
4. Click here to view the years after 2015.
5. Click here to select the highlighted month and year.
6. Click here to close the pop-up calendar.
Export Reports
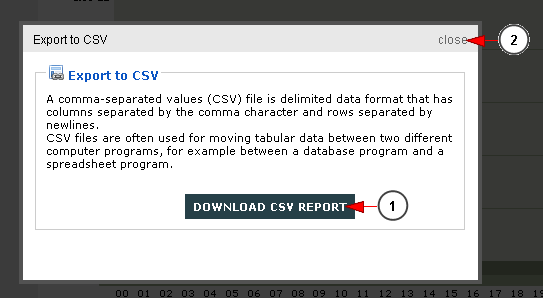
If you click on the Export link, a pop-up window will open and you will be able to download the reports into a CSV file format:
1. Click here to download the CSV file with the listed reports.
2. Click here to close this pop-up window.
Printer Friendly Reports
If you click on the Printer Friendly link, a pop-up window will open with the reports listed so you can easily print the page:
Report Options
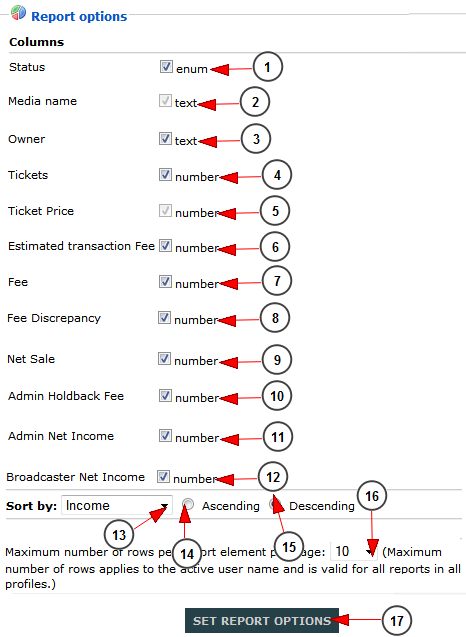
If you click on the Report Options link, a pop-up window will open and you will be able to manage the columns that will be listed on the reports page:
1. Check this box if you want to list the status of the media file.
2. Check this box if you want to list the name of the media file – this is disabled by default.
3. Check this box if you want to list the owner of the media file.
4. Check this box if you want to list the number of tickets sold for this media file.
5. Check this box if you want to list the ticket price.
6. Check this box if you want to list the estimated transaction fee.
7. Check this box if you want to list the actual transaction fee.
8. Check this box if you want to list the fee discrepancy.
9. Check this box if you want to list the net sale.
10. Check this box if you want to list the admin holdback fee.
11. Check this box if you want to list the admin net income.
12. Check this box if you want to list the broadcaster net income.
13. From this drop-down menu you can select to sort the reports by: media type, owner, tickets, average price, income, fee.
14. Check this radio button if you want to list the reports in ascending mode.
15. Check this radio button if you want to list the reports in descending mode.
16. From this drop-down menu you can select how many rows will be listed on page.
17. Click here to save the report options.


