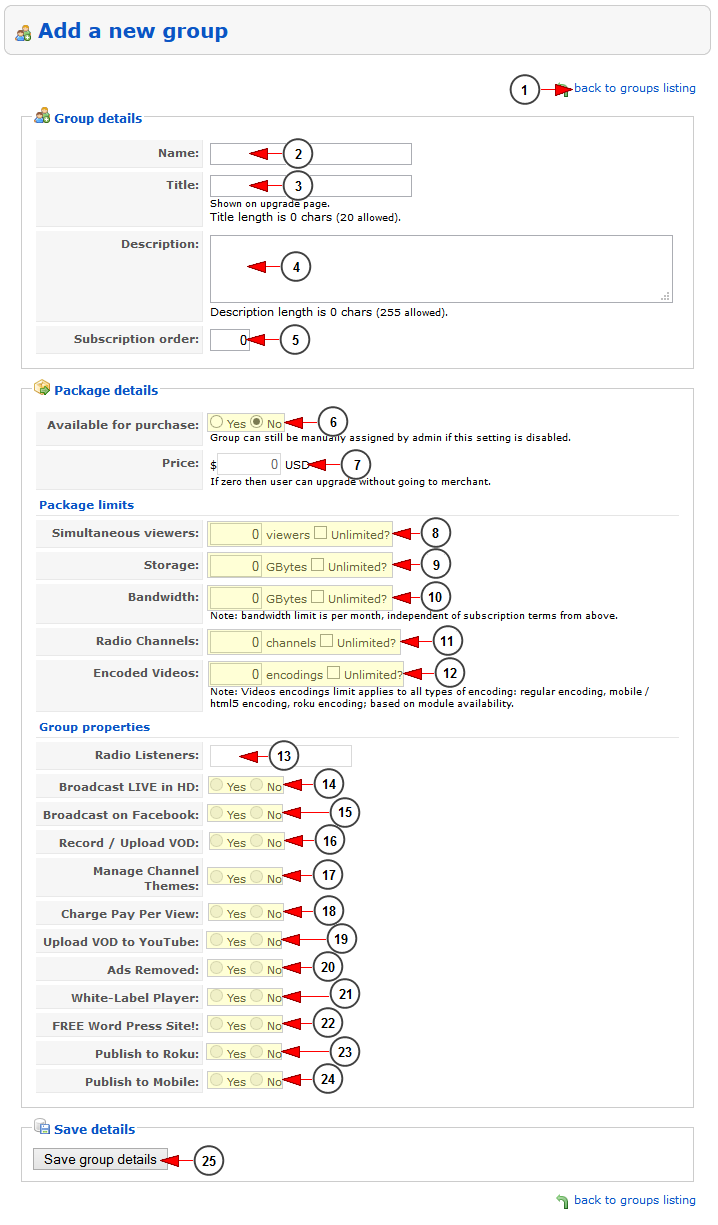
You can add a new group into the system by clicking on the Add New Group link from the Groups Listing page:
1. Click here to go back to Groups listing page.
2. Insert here the name of the group.
3. Enter here the title of the group which will be displayed on Upgrade account page.
4. Enter here the description of the group.
5. Enter here the subscription order for this group – this is used to list the groups in front-end area.
6. Check the YES radio button if you want to make this group available for purchase or the NO radio button if you don’t want to make this group available for purchase – it will be free.
7. Enter here the price of this group package.
8. Enter the number of simultaneous viewers available for the group, or check the box if you want to give unlimited simultaneous viewers to this group.
9. Enter here the storage limit available for the group, or check this box if you want to give unlimited storage to this group.
10. Enter here the bandwidth limit available for the group, or check this box if you want to give unlimited bandwidth to this group.
11. Enter here the number of radio channels limit available for the group, or check this box if you want to give unlimited radio channels to this group.
12. Enter here the number of video encodes available for the group, or check this box if you want to give unlimited video encodes to this group.
13. Insert here the limit number of radio listeners available for the group.
14. Check the Yes radio button if you want to allows users from the group to broadcast live in HD, or the No radio button if you don’t want to allows users from the group to broadcast live in HD.
15. Check the Yes radio button if you want to allows users from the group to broadcast to Facebook or the No radio button if you don’t want to allows users from the group to broadcast on Facebook.
16. Check the Yes radio button if you want to allows users from the group to record/upload videos or the No radio button if you don’t want to allows users from the group to record/upload videos.
17. Check the Yes radio button if you want to allows users from the group to manage channel themes or the No radio button if you don’t want to allows users from the group to manage channel themes.
18. Check the Yes radio button if you want to allows users from the group to charge people for viewing their content (create PPV events or videos) or the No radio button if you don’t want to allows users from the group to charge people for viewing their content.
19. Check the Yes radio button if you want to allows users from the group to upload videos to Youtube or the No radio button if you don’t want to allows users from the group to upload videos to Youtube.
20. Check the Yes radio button if you want to allows users from the group to manage Ads playback on their channels or the No radio button if you don’t want to allows users from the group to manage Ads playback on their channels.
Note: this permission is related to Ads optional module.
21. Check the Yes radio button if you want to allows users from the group to brand their channel players with their own logo or the No radio button if you don’t want to allows users from the group to brand their channel players with their own logo.
22. Check the Yes radio button if you want to allows users from the group to have a WordPress site or the No radio button if you don’t want to allows users from the group to have a WordPress site.
23. Check the Yes radio button if you want to allows users from the group to publish content on Roku or the No radio button if you don’t want to allows users from the group to publish content on Roku.
24. Check the Yes radio button if you want to allows users from the group to publish content to mobile devices or the No radio button if you don’t want to allows users from the group to publish content to mobile devices.
25. Click here to save the new group details
Important: the admin can manage all the group properties from Groups properties page.

