You need to click on Site Settings link under Settings menu in admin dashboard:

In this page you can edit the settings of your Streaming platform system. The settings that you can edit are:
- Under maintenance
- Platform version
- Channels Settings
- WordPress shopping cart service fee (optional module)
- Force Applications Authentication
- DVR settings (optional module)
- Disclaimer Window
- Talk to Us window
- Encoder default settings
- Homepage Display
- Homepage Featured Items Settings
- Pagination Settings
- Registration options
- Set the payment options for broadcasters
- Embed options
- Auto-recording Settings
- Chat settings
- PPV details (optional module)
- Refunds (optional module)
- CDN Status (optional module)
- Manual link
- Youtube Upload API credentials (OAuth Settings)
- Social Reach settings
- Playback options
- Hosting calculator settings
Under maintenance
This feature can be used whenever a major upgrade is performed on the platform, in order to restrict users access to the website while ongoing work.

1. Check the Yes radio button if you want to enable Under maintenance feature.
2. Check the Yes radio button if you want to disable Under maintenance feature.
Platform version
This is how the Platform version area looks like and below we will explain each field:

The admin can edit the platform version which will be displayed on the footer area on the website, user dashboard and admin login page.
Channel Settings
From the channel Settings area you can select to have unique channel names:

1. Check this radio button if you want to have unique names for the channels
2. Check this radio button if you want to allow users to use the same name for the channels
WordPress shopping cart service fee
This section allows website administrators to set the service fee for WordPress products sold on the platform:

Force Applications Authentication
You can set the version of the Roku application:

1. Check this radio button if you want to force the Roku authentication – the user will be forced to login into his account when he wants to access content on Roku: channels, videos.
2. Check this radio button if you don’t want to force Roku authentication.
3. Check this radio button if you want to disable the login on Roku box – the Login, Account and DVR menu items will not be displayed
4. Check this radio button if you want to leave the Login, Account and DVR menu items displayed on the application
DVR settings
The admin can set a limited time for the DVR files to be available. After the limit is set, the DVR files will be automatically deleted:

Disclaimer window
This is how the Disclaimer window area looks like and below we will explain each field:

1. Check this radio button if you want to show the disclaimer in channel and video page.
2. Check this radio button if you don’t want to show the disclaimer in channel and video page.
3. Check this radio button if you want to show the disclaimer in homepage.
4. Check this radio button if you don’t want to show the disclaimer in homepage.
“Talk to Us” window
This is how the Talk to Us window area looks like and below we will explain each field:

1. Check this radio button if you want the “Talk to Us” window to be displayed on the website.
2. Check this radio button if you don’t want the “Talk to Us” window to be displayed on the website.
This is how the “Talk to Us” window looks on the website:

Encoder Default Settings
The website administrator can customize the default encoding settings that will be set for users.
Note: users are able to customize the encoding options, if they want.
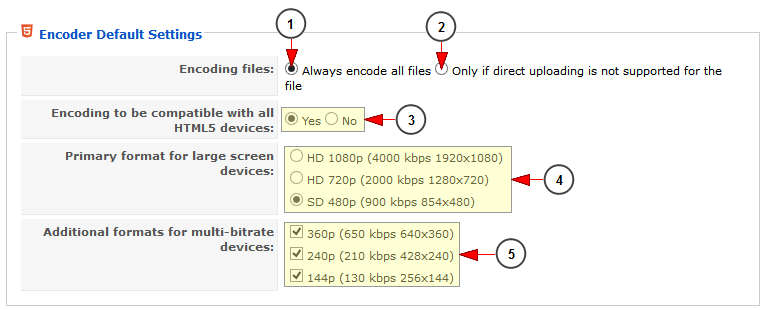
1. Check this radio button to encode all video files.
2. Check this radio button if you want to encode videos that are not available for direct uploading.
3. Check the Yes radio button if you want the files to be encoded for all HTML5 devices, or the No radio button if you don’t want the files to be encoded for all HTML5 devices.
4. Check the radio button to select the primary format resolution.
5. Check the boxes to select additional encoding formats for multi-bitrate devices.
Homepage Display
This is how the Homepage Display area looks like and below we will explain each field:

1. Insert here the number of live channels you want to display on the homepage.
2. Check this radio button if you want to list the featured videos on homepage. Click here to view how the videos will appear on homepage.
3. Check this radio button if you want to list the most watched videos on homepage. Click here to view how the videos will appear on homepage.
Featured videos displayed on Homepage:

Most watched videos displayed on Homepage:

Homepage Featured Items Settings
This is how the Homepage Featured Items Settings area looks like and below we will explain each field:

1. Enter here the number of featured channels that will be displayed on homepage.
2. Enter here the number of featured (most watched) videos that will be displayed on homepage.
Pagination Settings

1. Insert here the number of items you want to be displayed on main pages.
2. Insert here the number of items you want to be displayed on the sidebar.
3. Insert here the number of items you want to be displayed on Search Pages.
Registration options
This is how the Registration options area looks like and below we will explain each field:

1. Check this radio button if you want to enable the split registration – the users will be able to choose between Viewers and Broadcasters when they will register.
2. Check this radio button if you want to disable the split registration – all users that will register into the system will be broadcasters and viewers and will receive the group permissions as detailed into point 3.
3. Select from this drop-down menu the default group that will apply to new users that will register as viewers.
Note: Guest Users cannot be set as the default Group Type.
4. From here you can select to offer or not the default group as Free Trial for new viewers – if set to yes, the users will belong to the selected group at point 3 for a specific period of time.
5. Select from this drop-down menu the group to which the viewers will revert when the trial period will expire.
6. Select from this drop-down menu the default group that will apply to new users that will register as broadcasters.
7. From here you can select to offer or not the default group as Free Trial for new broadcasters – if set to yes, the broadcasters will belong to the selected group at point 6 for a specific period of time; after that period of time they will belong to the group selected at point 8.
Note: When the Free trial period is active the broadcaster confirmation option is disabled by default.
Important: once you set a price on a group and then you set it as free trial, you cannot edit the price afterwards.
8. Select from this drop-down menu the group to which the broadcasters will revert when the trial period will expire.
9. From here you can select to turn on or off the broadcaster confirmation request.
10. Check this radio button if you want to subscribe users to all email notifications.
11. Check this radio button if you don’t want to subscribe users to any email notifications.
12. Check this radio button if you want to subscribe users to some email notifications you select in the list below.
13. Select the email notifications you want users to be subscribed to.
Set the payment options for broadcasters
This is how the Payment options area looks like and below we will explain each field:

1. Check this box to enable PayPal payment option for broadcasters.
2. Check this box to enable Check payment option for broadcasters.
3. Check this box to enable Wire Transfer payment option for broadcasters.
Embed options
This is how the Embed options area looks like and below we will explain each field:

1. Check this radio button to allow channel and VOD embedding.
2. Check this radio button if you don’t want to allow channel and VOD embedding.
3. Check this radio button to hide the embed code from users.
4. Check this radio button if you don’t want to hide the embed code from users.
Auto-recording Settings
This is how the Auto-recording Settings area looks like and below we will explain each field:

1. Check the yes radio button if you want to enable auto record and the no radio button if you don’t want to enable auto record.
2. Check the yes radio button if you want to allow users to choose auto record settings and the no radio button if you don’t want to allow users to choose auto record settings.
3. Select from the drop down list the gap time for appending the recordings. This setting is available if the user isn’t allowed to choose the auto record settings (if you selected the no radio button from no.2 in the list).
Note: this option is set if a broadcaster may loose connection to server and this way he will have one video for the broadcast. The server will wait for the set time before finishing the video.
4. Select from the drop down list the auto record time limit. You can select a limited recording time or no limit.
5. Select from the drop down list if you want to split long recordings. You can select the period of time after which the recording is sliced.
Chat settings

1. Insert here the maximum number of messages you want to allow in the chat.
2. Insert here maximum the number of seconds for the selected number of messages.
3. Check this box if you want to enable the emoticons to be used by users in chat
4. Check this box if you don’t want to enable emoticons on chat
5. Click here to navigate to the page from where you can manage the emoticons
PPV details
Important: this setting is integrated into Social Broadcasters Module.
This is how the PPV details area looks like and below we will explain each field:

1. Enter here the percentage for channel event holdback.
2. Enter here the percentage for VOD holdback.
3. Enter here the percentage for the transaction fee (estimate).
4. Enter here the value (USD) that will be retained (holdback) for each sale.
Note: the estimated transaction fee and holdback per sale are PayPal standard fees, which can be set in the fields above (3 and 4) or if they are set to 0, they will automatically be deducted from the Admin holdback.
5. Enter here the minimum price that can be set for a ticket.
Refunds
Important: this setting is integrated into Social Broadcasters Module.
This is how the Refunds area looks like and below we will explain each field:

1. Insert here the number of hours for the refund expiration time limit for PPV videos tickets (the refund expiration limit is calculated from the moment the ticket is purchased).
2. Insert here the number of hours for the refund expiration time limit for PPV events tickets (the refund expiration limit is calculated from the moment the event starts).
CDN Status
Important: this setting is included into CDN Optional module.
This is how the CDN status area looks like and below we will explain each field:

1. From here you can enable or disable the CDN.
- If CND is enabled, Admin can choose to enable CDN for Channels or Video. All the new created channels will have the broadcast through the CDN, an option enabled by default.
- If CDN is disabled, all the new created channels will have the broadcast through Streaming platform servers, an option enabled by default.
2. From here you can set the channels to stream by default through CDN.
- If the stream channels through CDN is enabled you won’t see the CDN settings in Edit Channel page.
- If the stream channels through CDN is disabled you will see the CDN settings in Edit Channel page, like in the following picture:

3. From here you can set the video playback through CDN by default.
- If the video playback through CDN is enabled you won’t see the CDN settings in Edit Videos page.
- If the stream channels through CDN is disabled you will see the CDN settings in Edit Videos page, like in the following picture:

Manual
This is how the Manual area looks like and below we will explain each field:

Insert the admin manual link that will appear in the admin back-end sidebar menu.
Youtube Upload API credentials (OAuth Settings)

1. Enter here the client ID you have been provided from your Youtube account.
2. Enter here the client secret ID you have been provided from your Youtube account.
3. Enter here the developer API key.
4. Click here to save the settings.
Note: in order to learn how to get your YouTube API credentials, click on the link and you will be redirected to the manual page.
Social Reach

1. Insert here the Facebook likes API URL.
2. Insert here the Google plus API URL.
3. Insert here the Twitter API URL.
Note: read more details about Twitter API on Twitter account settings page.
4. Insert here the Google API email.
5. Insert here the Google API client ID.
6. Insert here the Google API profile ID.
7. Click here to upload your private key file.
Note: read more details about Google API credentials as exemplified on the following manual page.
8. Click here to save the settings.
Important: all Google API credentials can be created in https://code.google.com/apis/console/.
This feature allows the website administrator to activate the idle stream timeout, an option which will interrupt the video stream if no action is performed on the player.

1. Check this box if you want to enable idle stream timeout.
2. Insert here the number of minutes after which the stream will be interrupted, if no action is performed on the player.
Hosting calculator settings
Website administrators can customize the hosting calculator settings.

Once your settings are completed, click on the Save Settings button in order to save the changes you made:
