Important: in order to broadcast on a radio channel using Winamp DJ you need to install Winamp application (http://www.winamp.com/) and Edcast plugin (Edcast plugin can be installed from here).
Winamp DJ application offers you the possibility to broadcast your playlist and also to stream your microphone.
The first thing you need to do is to install the Edcast DSP Plugin and lame_enc.dll on your PC.
Download the Edcast Plugin for Winamp and install it. This is a free plugin for Winamp that lets you stream out to the Internet. Follow the onscreen instructions and the plugin will be properly installed.
Download the LAME MP3 encoding plugin (lame_enc.dll) and place it into your Winamp folder. Do this by right clicking the link and choosing “Save Link As…”, then navigate into ‘C:\Program Files (x86)\Winamp’ before clicking the Save button.
Once the application and the plugin are installed in your computer, you need to configure Winamp broadcast settings.You can do that by viewing the broadcast settings for Winamp from your account dashboard on the Broadcasting Properties page:
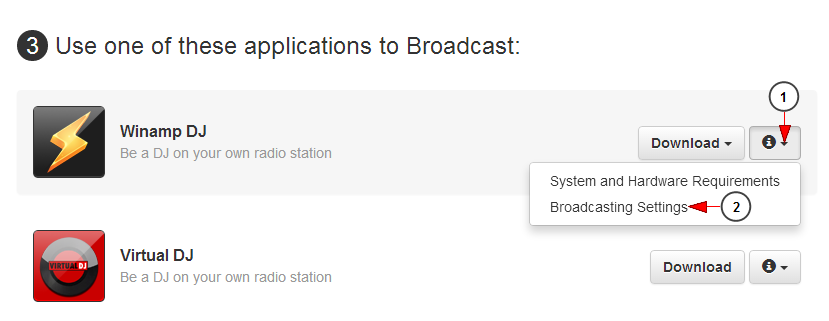
1. Click here to open the drop-down menu.
2. Click here to view the broadcast settings for Winamp DJ.
An overlay window will be displayed and you can view the settings you need when configuring Winamp application in your computer:
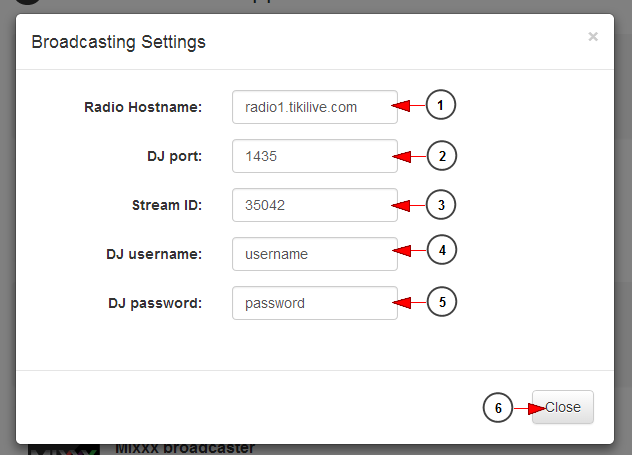
Important: The values from the above image are for demonstration only, in order to stream on your channel you need to use your own broadcasting settings from your TikiLIVE dashboard account.
1. Here you can see the radio host-name.
2. Here you can see the DJ port number.
3. Here you can see the stream ID.
4. Here you can see the DJ username.
5. Here you can see the DJ password.
Note: the DJ credentials are the ones you insert when you edit the radio channel. The username and password can contain only lower case letters, numbers and dashes (a-z/A-Z/0-9 -).
6. Click here to close the overlay window.
Open Winamp and click CTRL and P on your keyboard to adjust the preferences.
You can also open the Winamp menu as you can see in the following picture:
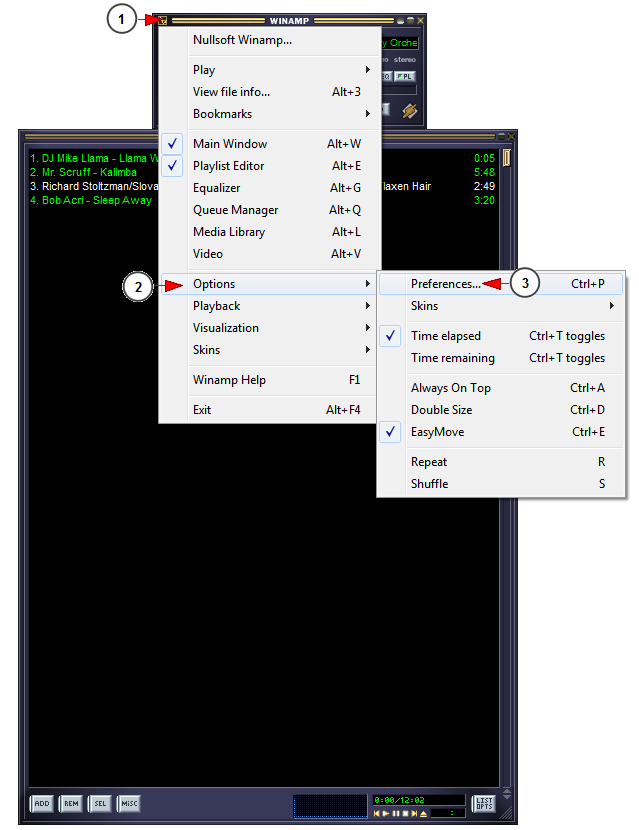
1. Click here to open Winamp menu.
2. Click on the Options link, to open the menu.
3. Click on Preferences link to edit the broadcast preferences.
On the preferences select the Edcast plugin, as detailed on the following image:
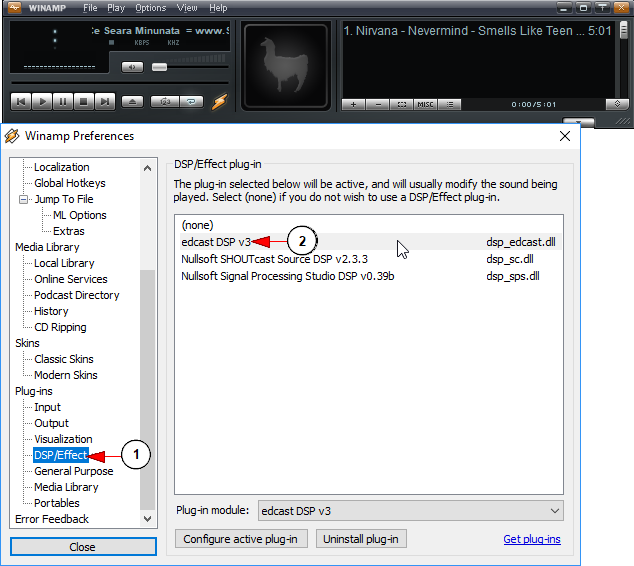
1. From the Plug-ins select the DSP/Effect
2. Click on the edcast DSP V3 plugin
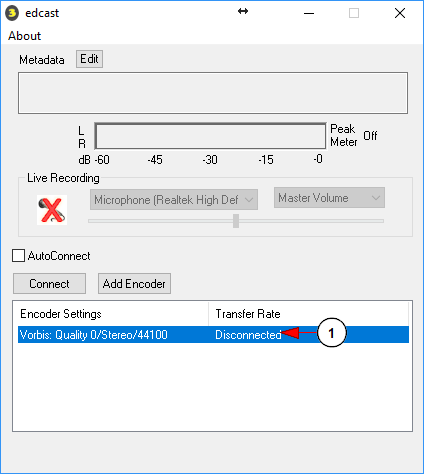
Once the edcast plugin will open you need to set it with the TikiLIVE broadcasting properties (the ones that you saw on the Broadcasting Settings page.
1. From the Plug-ins select the DSP/Effect
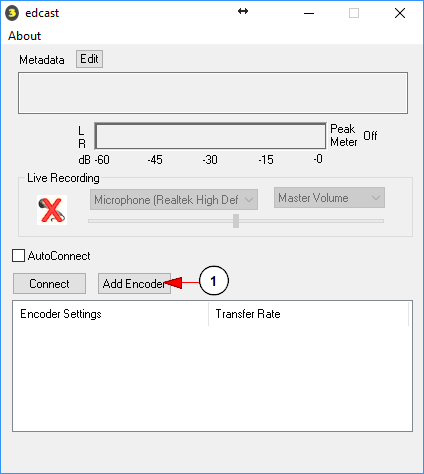
Double click on the encoder that you just added in order to set the streaming details:
1. Double click on the encoder in order to adjust the streaming settings
You can adjust the streaming settings that you saw on the Broadcasting Settings page:
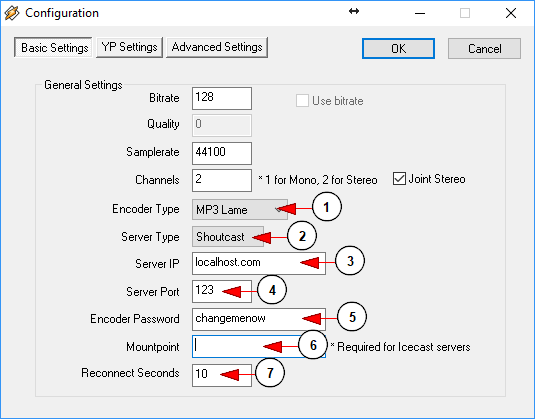
1. Select the MP3 Lame encoder type
2. Select the Shoutcast as the server type
3. On the server IP enter the Radio Hostname from Broadcasting Settings page
4. Enter here the DJ port from Broadcasting Settings page
5. Enter here the DJ username and DJ password on the format username:password
Note: the DJ credentials are the ones you insert when you create a new radio channel. The username and password can contain only letters, numbers and dashes (a-z/A-Z/0-9 -).
6. Delete the text that appears on the Mountpoint field
7. Select the reconnecting time for the broadcaster
Once all the settings are done click on OK button
After you have adjusted the settings, click on Connect button and the edcast will start streaming on the radio channel. This is how the plugin looks like when it broadcasts to the radio station:
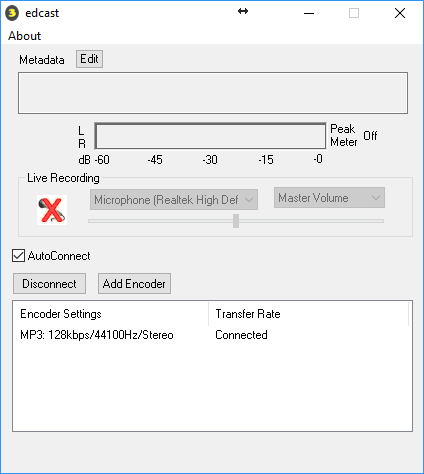
If you want to set the Plugin to automatically reconnect to the server, check the AutoConnect check-box