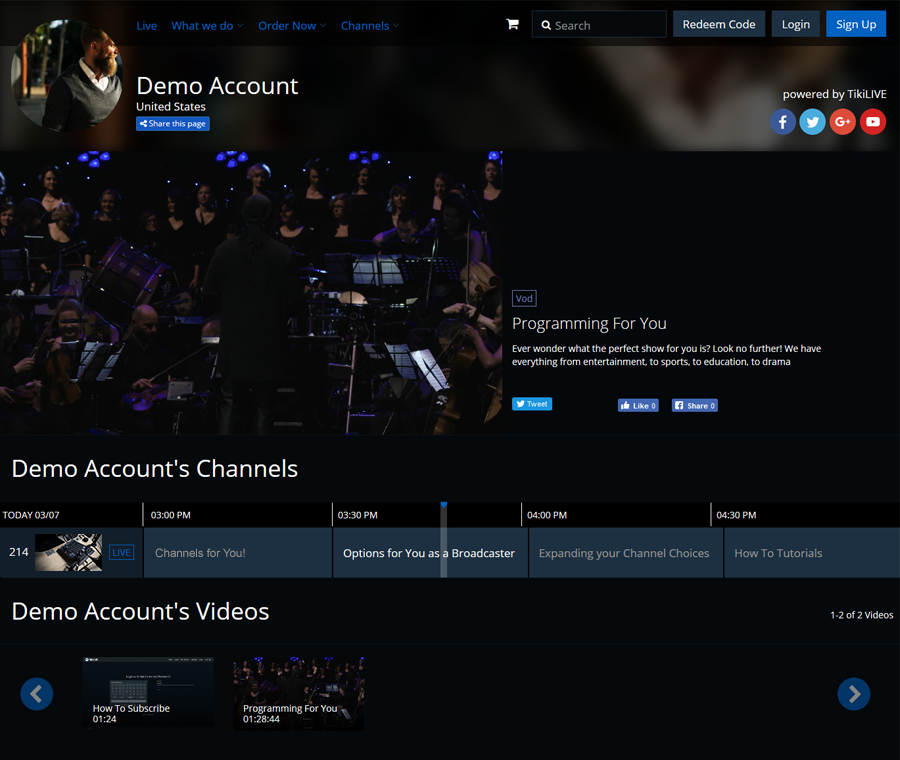
A Network page is a central hub for viewers trying to access a broadcaster’s content. Your Network page is built by default for your account and can be accessed via a sub-domain similar to username.streamingplatform.com, where “username” is your username.
On this page we will explain to you how to setup your Network page so it is ready for an event to general advertising:
- Create a channel.
- Upload a profile and channel image.
- Update your social media links to generate the buttons.
- Make sure Window to the World feature is enabled.
- Upload and encode videos, and assign them to your channel.
- Create a playlist and assign it to loop on the channel.
- Schedule 24/7 programming for a professional-looking EPG.
- Make channels “featured” to play on the Network page.
- Make a video “featured” to play on the Network’s channel page.
When you follow all these steps, you will have a fully setup Network page that can perfectly show off you and your content to viewers:
1. Create a channel
To start off, make sure you have a channel created. If not, you can create a new channel using your account dashboard. This is where you will display your live streams for your content.
If you already have a channel created, we’ll go over how to add content in a later step.
2. Upload a profile and channel image.
Make sure to brand yourself so people know who and what they are watching. You can do this by adding profile and channel images to your account.
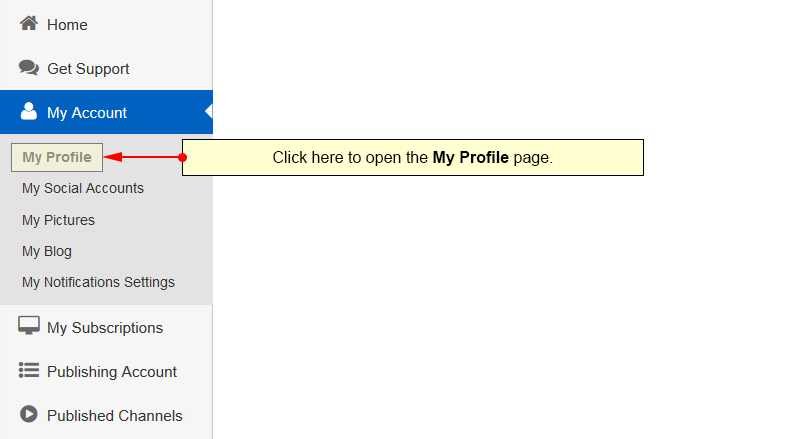
A profile images shows viewers who they are watching with a simple picture. To upload a profile image, access the My Profile page from your account dashboard:

When the page loads, you can update your profile image:
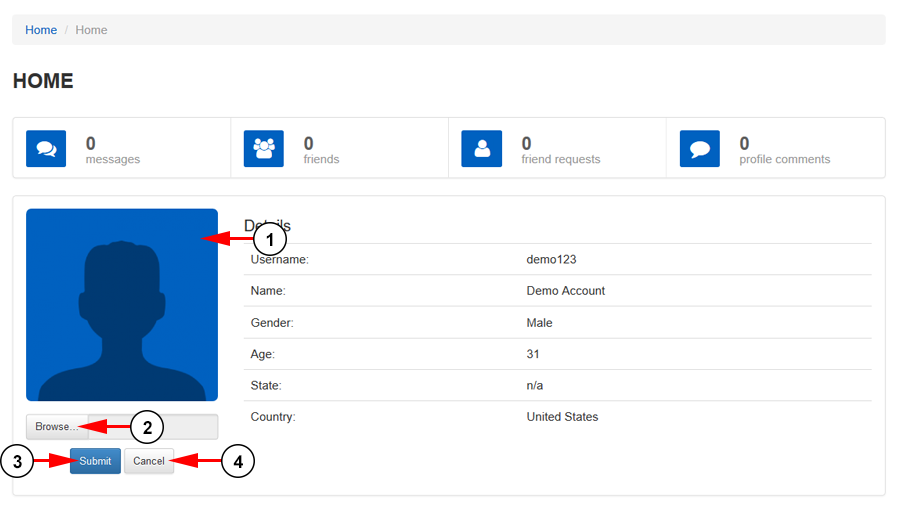
1. Here you can see your current profile image. If you have not uploaded one yet, you will see the default silhouette image.
2. Click the button here to upload your own image.
3. Click the button here to confirm uploading your image.
4. Click the button here to cancel your upload.
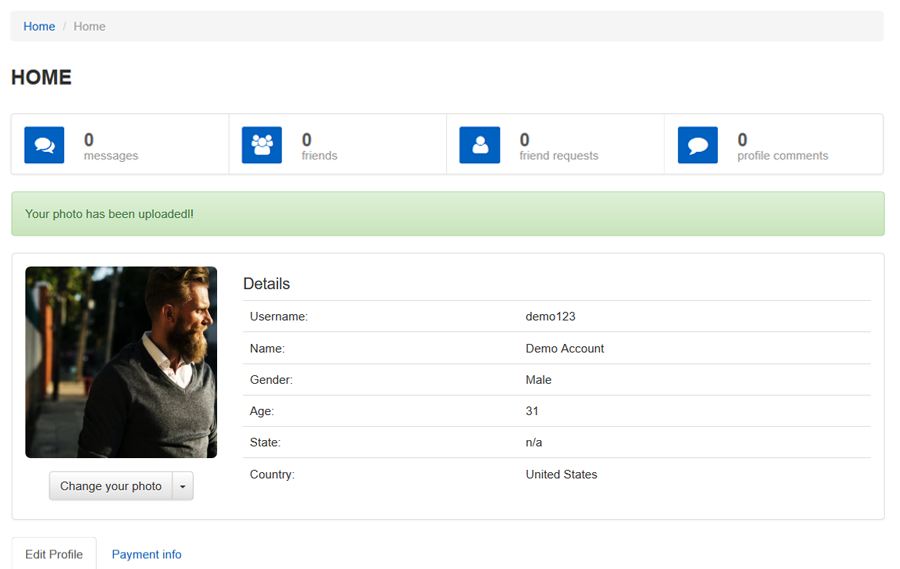
When the upload is complete, the page will reload and you will see your new profile image:
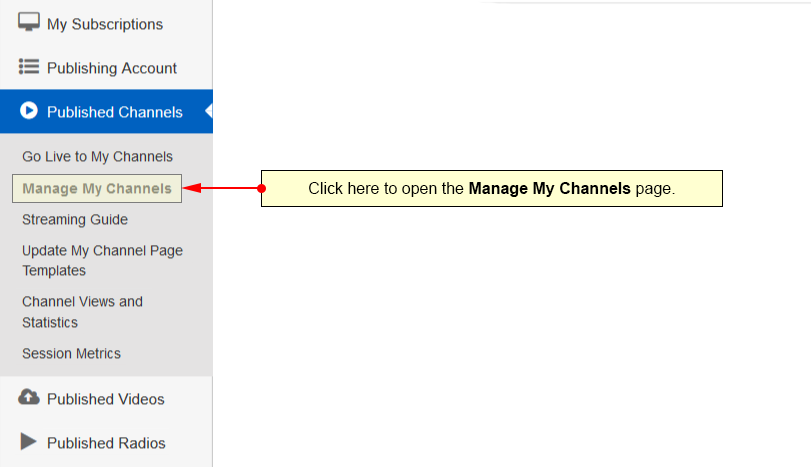
To upload a channel image, you can do this from the Manage My Channels page:
Select the channel you would like to add the image to and edit it:
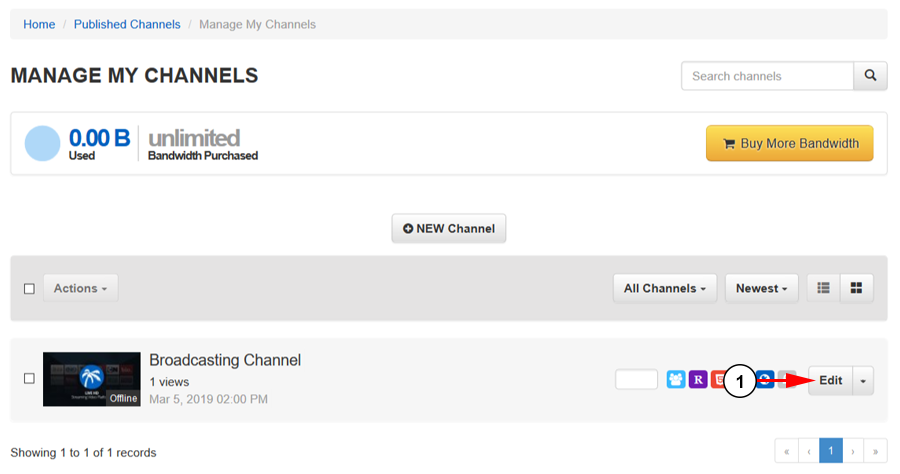
1. Click the button here to edit the channel.

1. Click the button here to upload your own image. The image should be a valid jpg file with the minimum dimensions of 540px width and 304px height, and an aspect ratio of 16×9.
Note: There is a cache of a about 3 hours until thumb is displayed on the channel.
2. Here you can see your current image. If you have not uploaded one, this will be the generic channel thumbnail photo.
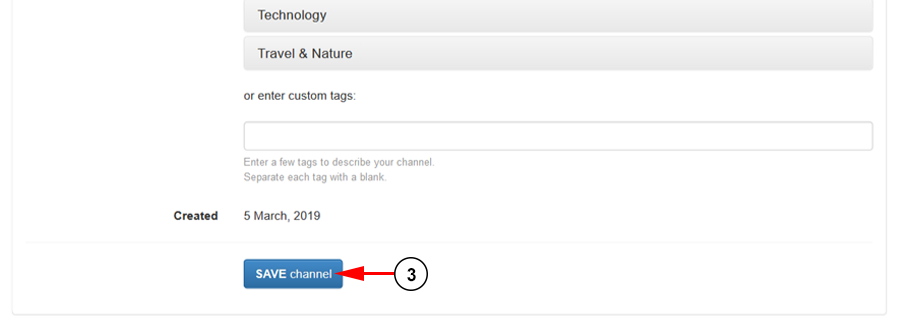
3. Click the button here to save your changes.
3. Update your social media links to generate the buttons.
Users have the ability to add their social media links to their profile. This way, viewers will be able to follow you everywhere right from Streaming Platform.
Open the My Profile page to being editing:
Scroll down to the social links section to add the social buttons to your Network page:
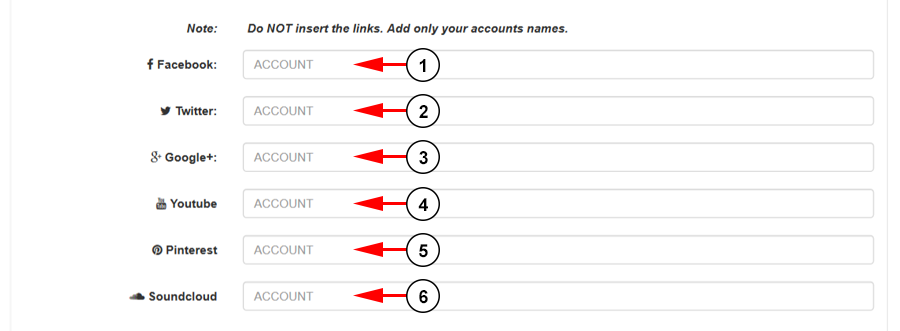
1. Insert here your Facebook account name. This can be a Facebook profile, page, or account.
2. Insert here your Twitter handle name.
3. Insert here your Google+ profile name.
4. Insert here your YouTube channel name.
5. Insert here your Pinterest profile name.
6. Insert here your Soundcloud profile name.
Note: Do not add the full social media link to the section. Instead, you will be adding the name of the account itself that can be found in the URL. For example, if you want to link your Facebook page that has the link, https://www.facebook.com/username, where “username” is the page name, you would enter “username” in the social on your profile page.
4. Make sure Window to the World feature is enabled.
Users have the ability to turn their Network page on or off depending on the amount of privacy they would like. If you are a broadcaster, it is recommended that you enable this feature to help advertise your content.
Access your My Profile page to enable this feature:

Scroll down to the Edit Profile section:
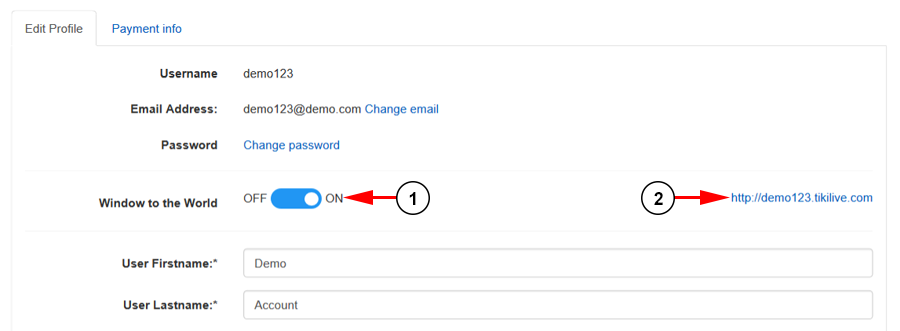
1. Make sure the toggle switch is turned from OFF to ON.
2. Here you can see the subdomain your Network page is located at.
5. Upload and encode videos, and assign them to your channel.
Next, start by adding content by uploading videos to your channel. During the upload process, make sure that you are assigning them to your channel as well so they can be access by viewers outside of the live stream if desired.
6. Create a playlist and assign it to loop on the channel.
Once you have your videos uploaded, you will want to create a video playlist with them. This will be used multiple ways in future steps to create a TV-like experience with your channel.
Once you have a playlist created, assign the playlist to loop on your channel continuously. This will ensure that something is always playing and your channel is never offline.
7. Schedule 24/7 programming for a professional-looking EPG.
Now that you have the basics for your channel setup, it’s time to take it a step further and make your channel more pro by adding 24/7 programming video the program calendar.
Access the Programming Calendar from your account dashboard and you will be able to add a new program to your video channel. It’s suggested that you add your content program by program with descriptions to create a programming guide similar to those seem on cable TV.
8. Make channels “featured” to play on the Network page.
Adding a featured channel to your Network page will help so that user’s can easily find your channels in one place when they access your page. You can even do this for multiple channels so they show on your Network page.
To add a channel as your featured channel, access the Manage My Channels page:
When the page loads, click the Edit button for the channel you would like to feature:
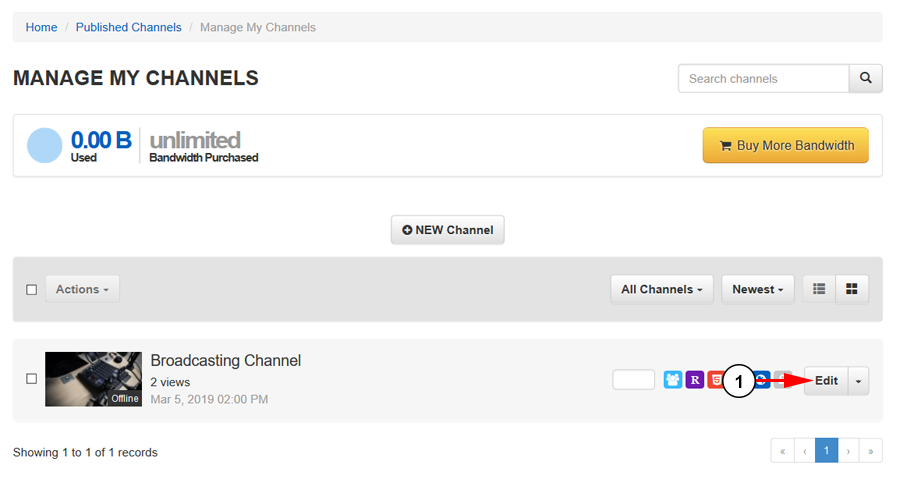
1. Click here to edit the channel.
Open the Channel Options & Privacy tab to access the feature option:
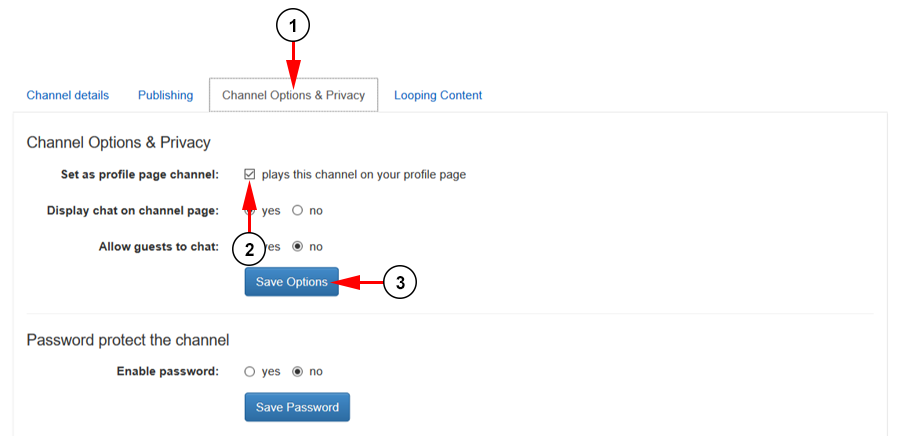
1. Click the tab here to open the Channel Options & Privacy.
2. Check the box here to set the channel as featured on your Network page.
3. Click the box here to save your changes.
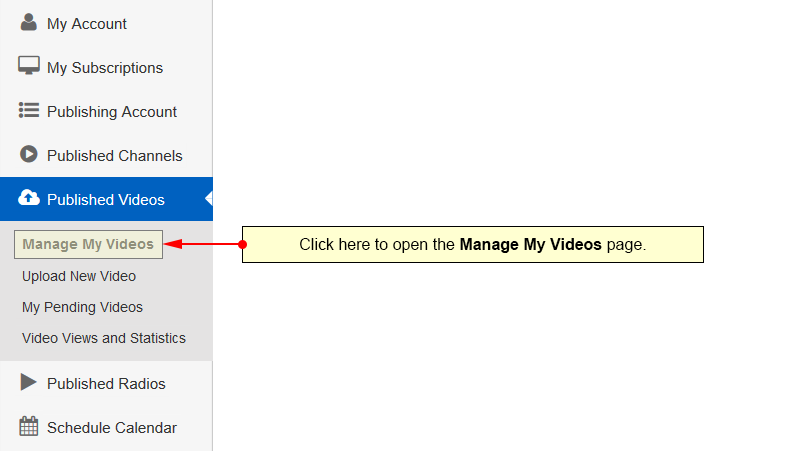
9. Make a video “featured” to play on the Network’s channel page.
Similar to adding featured channels to your Network page, you can also add a feature video, though only one in this case. This will automatically play at the top of the Network page when it is loaded. This could be any featured content you have, a trailer about your own network, or your latest video.
To enable a video on your Network page, access the Manage My Videos page:
From this page, you will be able to enable the video you select to your Network page:
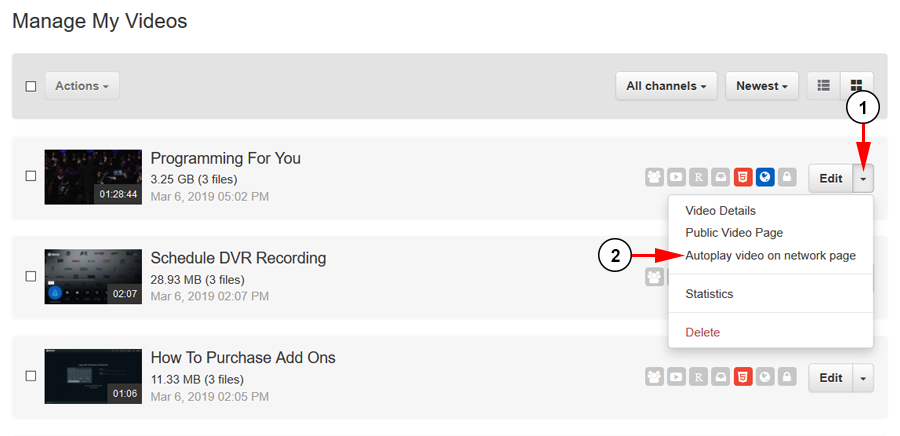
1. Click the drop-down arrow to open the options menu.
2. Click the option here to enable to video to automatically play on your Network page.
You will need to confirm your choice before the changes are applied:
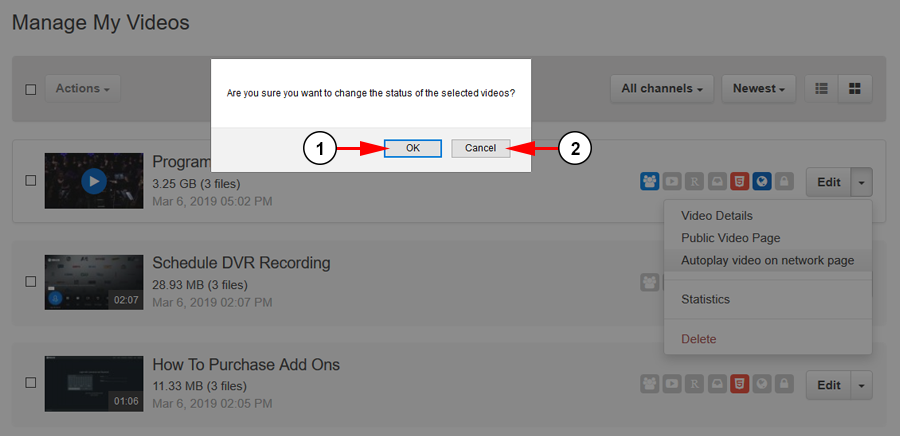
1. Click the button here to confirm the video.
2. Click the button here to cancel and return to the last page.