Logged in your account, click on the Manage My Radios link, under the Published Radios chapter.
On Manage Radio Channels page, click on Edit button for the channel you want to edit:
The edit channel details page will open and you can edit the general details of the channel:
1. Here you can see the number of views of the radio channel.
2. Here you can see the number of comments on the radio channel.
3. Click here to play the radio channel.
4. Click here to view the radio channel public page on the website.
5. Click here to view the radio channel URL in order to share it. A new overlay window will open displaying the video URL.
6. Click here to view the radio channel statistics. You will be redirected to Statistics page.
7 Click here to delete the radio channel.
8. Click here to open Channel details page.
9. Click here to edit the radio channel publishing details.
10. Click here to edit the radio channel options and privacy.
11. Here you can view and edit the radio channel title.
12. Here you can edit the channel slug.
13. Here you can preview the URL for your channel.
14. In this field you can insert a description for the radio channel.
15. Click here to browse an image in your computer in order to select it as radio channel thumbnail.
Note: We recommend the following settings for the radio channel thumbnail:
Width: 540 pixels
Height: 304 pixels
Format: JPG at 72 dpi
16. Here you can see the current radio channel thumbnail.
17. Click here to select the music genre of the radio channel.
18. Click here to reset the background radio player color.
Note: the default background color is set to transparent.
19. Check the Yes radio button if you want to enable the auto-play function on the radio channel page and the No radio button if you don’t want to enable the auto-play function on the radio channel page.
20. Insert here your DJ username.
21. Insert here your DJ password.
Note: DJ credentials are mandatory when broadcasting live on your radio channel. The username and password can contain only numbers, letters and dashes (a-z; A-Z; – )
22. In this section you can see the Category tags.
23. Check the desired boxes to select the tags for the channel.
24. Insert here the custom tag to describe your channel.
25. Here you can see the date when the radio channel was created.
26. Click here to save the radio channel details.
Share channel
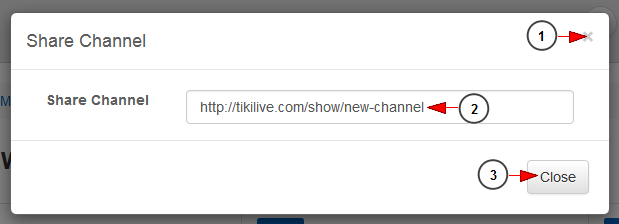
When you click on Share button an overlay window will open, and you can see the URL of the channel:
1. Click here to close the overlay window.
2. Here you can see the URL of the channel. You can copy it.
3. Click here to close the overlay window.


