The administrator of the website can view and edit the tickets sold in the system from Tickets Listing page. The admin can view the transactions report for a desired period of time and he can also grant users tickets to an event:
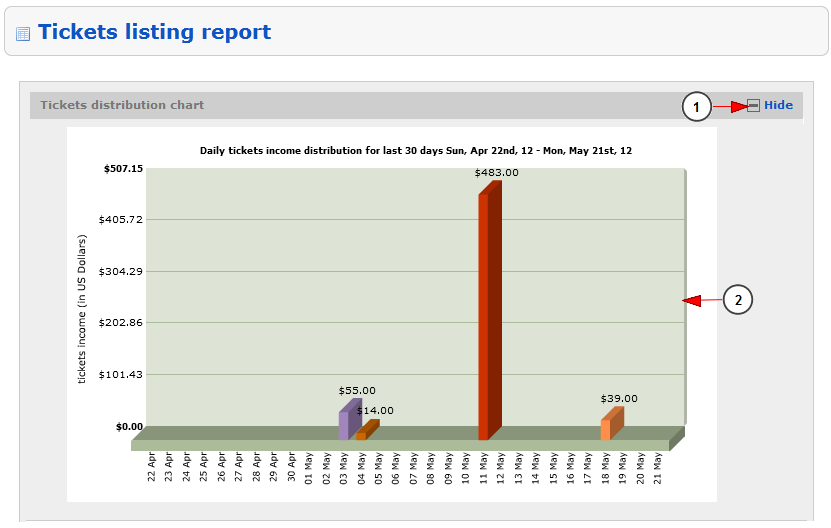
Tickets distribution chart
1. Click here to show/hide the tickets distribution chart
2. Here you can view the daily sold tickets bar graph for the selected period of time
Search filters
1. Check this radio button if you want to view the report for a pre-selected period of time
2. From this drop-down you can select the pre-selected period of time for which you want to view the report
3. Check this radio button if you want to view the report for an exact period of time
4. Click here to open the calendar and select the start date for reports
5. Click here to open the calendar and select the end date for reports
6. From this drop-down menu you can select the user who bought the tickets
7. From this drop-down menu you can select the broadcaster who sold the tickets
8. From this drop-down menu you can select the media type for which you want to view the reports: events or videos
9. Click on the drop down list to select the place from where you have bought the tickets: web, roku
10. Click on the drop down list to select the type of tickets you want to view the report: purchased, granted or both
11. Click here to filter the reports for the inserted search criteria
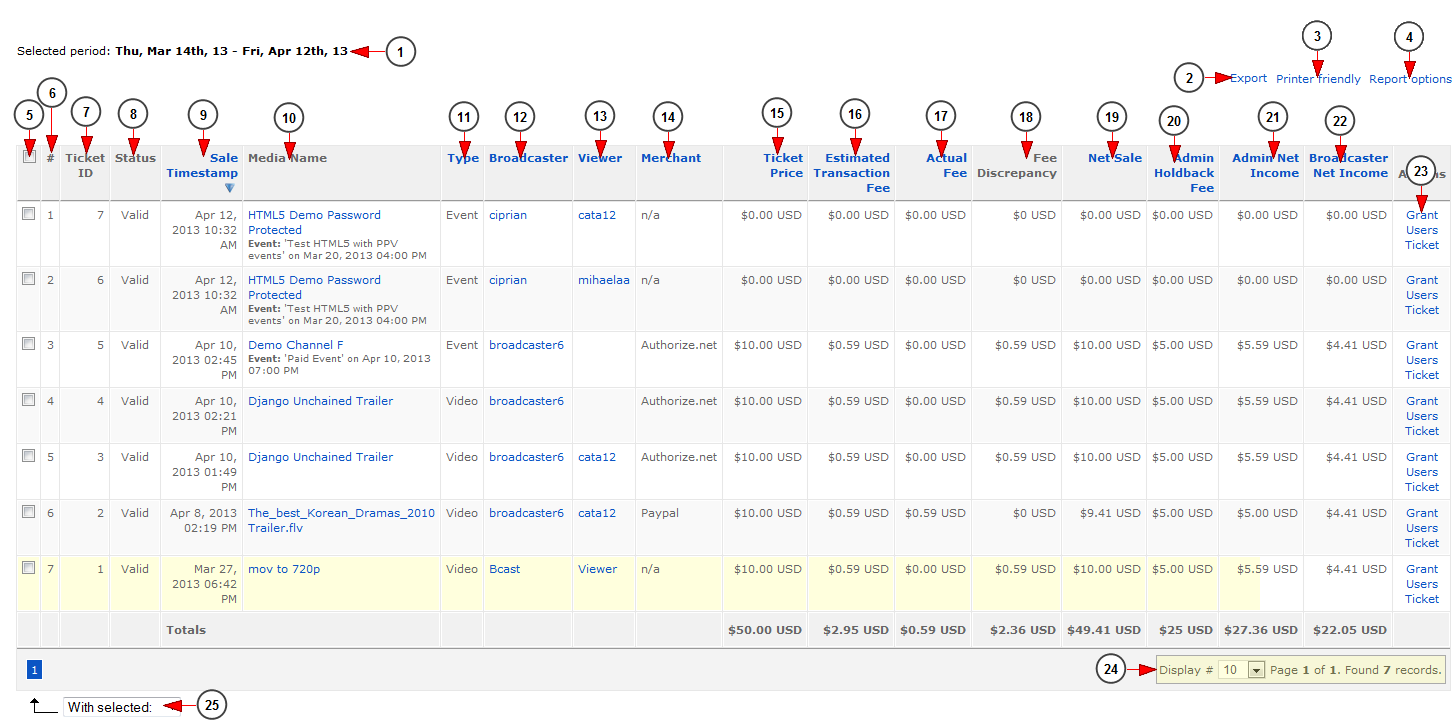
Tickets transactions
1. Here you can see the selected time periods for which the transactions are listed
2. Click here to export the report into a CSV file format
3. Click here to view the print format of the report – it will be opened into a pop-up window
4. Click here to adjust the report options
5. Here you can select the tickets for which you want to request refunding
6. Here you can see the transaction listing number
7. Here you can view the ID of the ticket
8. Here you can view the status of the media
9. Here you can view the time when the ticket was sold
10. Here you can view the name of the media – by clicking on the name you will be able to edit the media details: event or video
11. Here you can view the type of the media
12. Here you can view the name of the broadcaster that sold the ticket; by clicking on it you can edit the user account
13. Here you can view the name of the user that bought the ticket; by clicking on it you can edit the user account
14. Here you can view the merchant type
15. Here you can view the price of the ticket
16. Here you can view the estimated transaction fee. This is a percent set by admin on Site Settings area
17. Here you can view the actual fee that the payment gateway took for this transaction
18. Here you can view the fee discrepancy – this is the difference from estimated transaction fee and actual fee. This fee is supported bu the admin
Note: Fee represents the sum of the amount earned by Admin based on percentage set in Site Settings and Merchant (PayPal) fees.
19. Here you can view the net sale amount – this is the ticket price without the actual transaction fee
20. Here you can view the admin holdback fee – this is the fee percentage set by admin in Site Settings area
21. Here you can view the net income that the admin gains from the transaction
22. Here you can view the amount that the broadcaster receives for selling the ticket
23. Click here to grant user ticket – this option allows admin to give free tickets to users registered on the platform
24. Here you view the pagination index, the number of items found and you can select how many records you want to see displayed on the page
25. Click here to request refund for the selected tickets


