The administrator of the website can configure the platform from Platform Customization page.
The admin can adjust the following settings:
-
- Application Name
- Update user “admin” email
- Update user “admin” password
- Set Merchant account details
- Set support emails
- WordPress Settings (optional module)
- HD Wave Broadcaster
- Token exchange rate
- Default Registration Group for Viewers
- Default Registration Group for Broadcasters
- Google Analytics Account
- Twitter API credentials (OAuth Settings)
- Manual link
- Set Main page top content settings (Content Slider, Video Players, Disabled)
- Contact Us Interests
- Facebook settings
- Robots.txt content
- Branding elements
- Set watermark logo in video player
- Set watermark logo in radio player
- Set administration area logo
- Set administration area favicon
Logged in as admin, click on Platform Customization link, under Settings chapter:

Once the page opens, you can adjust the settings for your platform:

1. Here you can see the percentage of the customized settings of your platform.
2. Here you can see the name of the setting. Click on it to view the customizations you can perform.
3. Click here to open the Manual page related to the setting.
4. Click here to open Admin actions log page.
5. The green icon indicates that the configuration settings have already been customized.
6. The yellow icon indicates that the configuration settings have not been customized yet.
Set Application Name
This is how the Application Name section looks like, where the admin can edit the name of the application:

1. Insert here the name of the application.
2. Click here to save the details.
Update user “admin” email
This is how the Update user “admin” email section looks like, where the admin can edit the email address of the administrator:

1. Insert here the email address of the administrator.
2. Click here to save the settings.
Update user “admin” password
This is how the Update user “admin” password section looks like, where the admin can edit the account password of the administrator:

1. Insert here the admin account password.
2. Re-type the admin account password.
3. Click here to save the settings.
Set Merchant account details
This is how the Set Merchant account details section looks like, where the admin is redirected to Merchant Setup page:

Set Support emails
This is how the Set support emails section looks like, where the admin can configure the email address where notifications regarding support tickets are received:

1. Enter the email address of the person in charge to answer to the technical broadcasting problems.
2. Enter the email address of the person in charge to answer to the general viewing/navigation problems.
3. Enter the email address of the person in charge to answer to the accounting and billing issues.
4. Enter the email address of the person in charge to answer to the general membership problems.
5. Click here to save details
Note:
1. Only one email can be added on the support emails field.
2. If the support emails are not filled in, then the email will be sent to all admin users that have the “support admin notifications: permission enabled.
Set WordPress settings
This is how the Set WordPress settings section looks like, where the admin can configure the settings for WordPress requests:

1. Check this radio button to create a WordPress site automatically when user clicks Request button.
2. Check this radio button if you want the admin to answer the user’s request for WordPress.
3. Click here to save the setting.
Set HD Wave settings
Note: this section is related to HD Wave broadcaster optional module.
This is how the Set HD Wave settings section looks like, where the admin can configure the settings for HD Wave broadcaster links:

1. Insert here the link where users are redirected if they want to buy HD Wave.
2. Insert here the link where users are redirected if they want to read more details about HD Wave.
3. Click here to save the settings.
Set Roku token exchange rate
Note: this section is related to Roku optional module.
This is how the Token exchange rate area looks like and below we will explain each field:

1. Enter here the amount of tokens which will be exchanged with the USD amount entered in point 2.
2. Enter here the amount of USD that will be exchanged with the tokens amount entered in point 1.
3. Click here to Save the details.
Set Default Registration Group for viewers
This is how the Set Default Registration Group for viewers area looks like, where the admin can edit the default group where users are integrated once they register as viewers on the website:

1. Select from the drop-down menu the default group to which users are assigned once they register as viewers.
2. Click here to save the settings.
Set Default Registration Group for broadcasters
This is how the Set Default Registration Group for broadcasters area looks like, where the admin can edit the default group where users are integrated once they register as broadcasters on the website:

1. Select from the drop-down menu the default group to which users are assigned once they register as broadcasters.
2. Click here to save the settings.
Set Google Analytics account
This is how the Set Google Analytics account area looks like, where the admin can edit the Google account code:

1. Insert here the Google Analytics account.
2. Click here to save the settings.
Twitter API credentials (OAuth Settings)
This is how the Twitter API credentials (OAuth Settings) area looks like, where the admin can edit the settings for Twitter account:

1. Enter here your consumer key you have been provided from your twitter account.
2. Enter here your consumer secret you have been provided from your twitter account.
3. Click here to save the settings.
Note: check the following manual page to view how to take the consumer key and secret key from your twitter account.
Set the Manual link
This is how the Manual link area looks like and below we will explain each field:
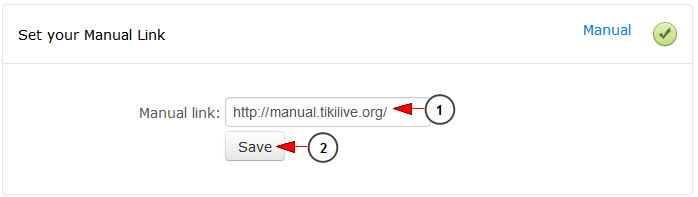
1. Type here the manual link that will open as a separate tab in dashboard area.
2. Click here to save the details.
Set Main Page Top Content Settings (Content Slider, Video Players, Disabled)
This is how the Set Main Page Top Content Settings area looks like and below we will explain each field:
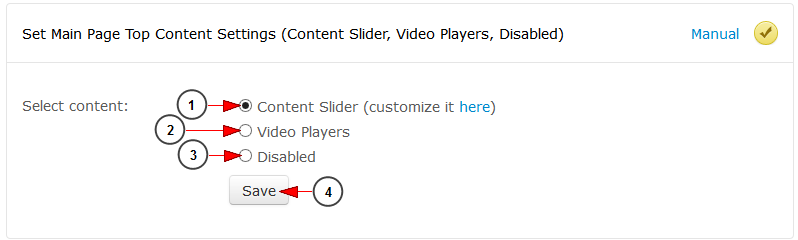
1. Check the radio button to select content slider option. The content slider can be customized from Main Page slider page.
2. Check the radio button to select video players option.
3. Check the radio button to disable the main page content section.
4. Click here to save the details.
Set Contact Us Interests
This is how the Contact Us Interests section looks like, where the admin is redirected to Contact Us Interests page:

Facebook settings
This is how the Facebook settings section looks like, where the admin can edit the Facebook application:

1. Insert here the application ID, provided when creating an App on your Facebook account.
2. Check the Yes radio button to enable Facebook log in.
3. Check the radio button to display only the Facebook comments – displays only the comments posted to your Facebook account.
Note: If your Streaming platform platform was upgraded to Streaming platform v4, will also see displayed their old comments from the platform, when selecting the option to view only Facebook comments.
4. Check the radio button to display Streaming platform comments – displays only the comments from the platform.
5. Check the radio button to display Both type of comments – displays the comments posted to your Facebook account and the comments from the platform.
6. Click here to save the settings.
Robots.txt content

1. Enter here the content of the robots.txt file.
2. Click here to save the new content of the robots.txt file.
Once you added the content, you can check the file at the following address: http:/yousitename.com/robots.txt (where yoursitename is the name of your website).
You can check the page that describes what content to be added into robots.txt file.
Branding elements for default theme
In this section you can edit the branding elements for the default themes. You can select the setting you want to adjust and you will be redirected to Branding template elements page:

1. Click here to customize the Website Logo for default theme.
2. Click here to customize the Dashboard Logo for default theme.
3. Click here to customize the Login overlay window logo for default theme.
4. Click here to customize the Channel/Video page logo for default theme.
5. Click here to customize the Favicon for default theme.
6. Click here to customize the Favicon .png for default theme.
7. Click here to customize the Channel default thumbnail for default theme.
8. Click here to customize the Video default thumbnail for default theme.
9. Click here to customize the Radio default thumbnail for default theme.
10. Click here to customize the Event default thumbnail for default theme.
11. Click here to customize the Radio event default thumbnail for default theme.
12. Click here to customize the Channel group default thumbnail for default theme.
13. Click here to customize the Radio album default thumbnail for default theme.
14. Click here to customize the Radio playlist default thumbnail for default theme.
15. Click here to customize the user default thumbnail for default theme.
Set Watermark Logo in Player
This is how the Set Watermark Logo in Player area looks like, where the admin can edit the watermark logo in video player:

1. Click here to browse a picture in your computer, taking into account the file type and size mentioned in red.
2. Here you can see how the watermark logo will be displayed.
3. Click here to save the details.
Set Watermark Logo in Radio
This is how the Set Watermark Logo in Radio area looks like, where the admin can edit the watermark logo in radio player:

1. Click here to browse a picture in your computer, taking into account the file type and size mentioned in red.
2. Here you can see how the watermark radio logo will be displayed.
3. Click here to save the details.
Set Administration Area Logo
This is how the Set Administration Area Logo area looks like, where the admin can edit the admin dashboard logo:
![]()
1. Click here to browse a picture in your computer, taking into account the file type and size mentioned in red.
2. Here you can see how the admin dashboard logo will be displayed.
3. Click here to save the details.
Set Administration Area Favicon
This is how the Set Administration Area Favicon area looks like, where the admin can edit the admin dashboard favicon:

1. Click here to browse a picture in your computer, taking into account the file type and size mentioned in red.
2. Here you can see how the admin favicon will be displayed.
3. Click here to save the details.