If you click on the name of a specific channel from the Channels Listing page, you will be able to edit the channel settings:

Once you click on the name of the channel, the edit channel page will open and the admin can edit the:
- status information settings
- set custom HLS on channel
- unrestricted streaming URLs
- broadcasting properties
- general information settings
- CDN settings – these settings are related to CDN optional module
- premium channel settings – these settings are related to optional module
- viewers information settings
- channel tickets settings – these settings are related to Social Broadcasters optional module
Status information settings
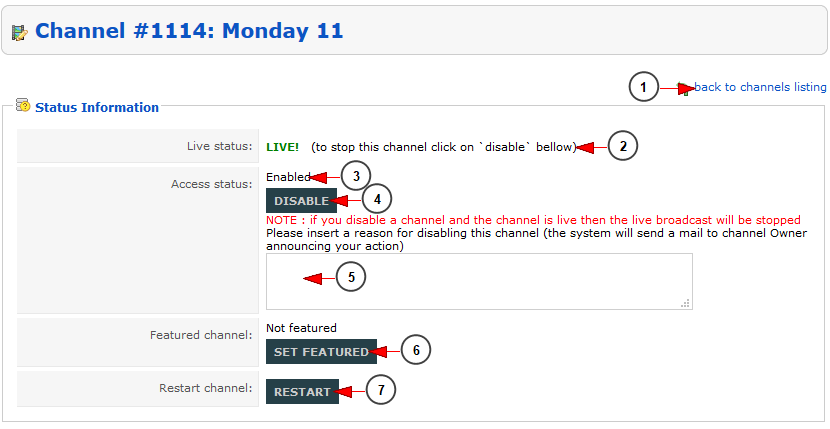
1. Click here to go back to Channels listing page.
2. Here you can view the live status of the channel: LIVE or OFFLINE.
3. Here you can view the status of this channel.
4. Click here to disable this channel.
Note: if the channel is live and you disable it, then the broadcast will be stopped.
5. Enter here the reason why you have disabled this channel.
6. Click here to set this channel as featured channel.
Note: when the channel is set as featured then it will be listed on home page under the Featured Channels list.
7. Click here to restart the channel
Note: when the channel is restarted, if the channel is Online it will go to Offline for few seconds; use this option only if the restart of the channel is really needed.
Set Custom HLS on the channel

1. Check this box to enable the custom HLS option for this channel.
Note: this option was implemented to allow the administrators to use 3rd party HLS streams URL into TikiLIVE channels.
2. Enter here the HLS link of the stream that you want to set to play on the channel
3. Click here to save the HLS stream settings for this channel
Unrestricted streaming URLs
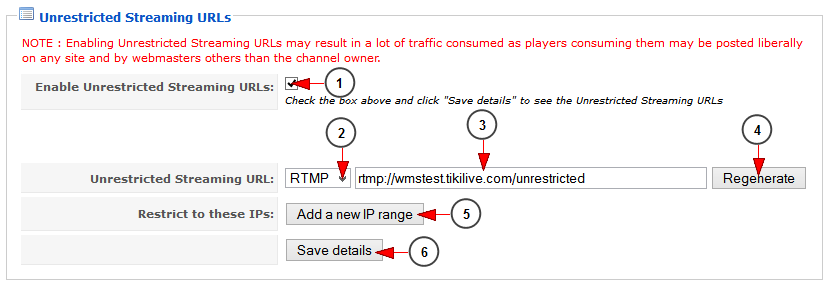
1. Check this box to enable unrestricted streaming URLs option.
Note: this option was implemented to allow the broadcasters to use the stream URL into another 3rd party players.
2. Select from the drop-down list the streaming URL type: RTMP, RTSP or HLS.
3. Here you can see the streaming URL.
4. Click here to regenerate a new streaming URL.
5. Click here to add an IP range to allow only a restricted number of IPs to have access to the stream.
6. Click here to save the details.
Broadcasting properties
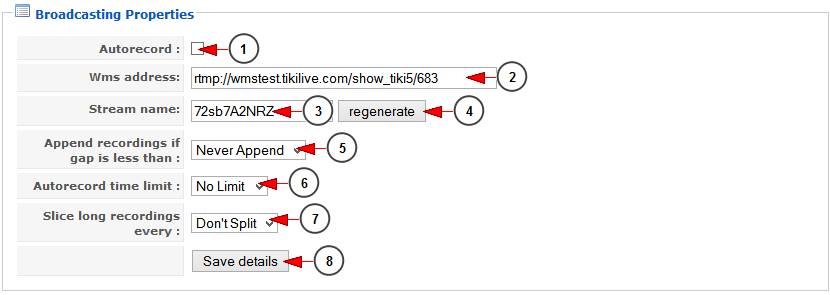
1. Check this box to enable auto recording.
2. Here you can view the URL address of the channel.
3. Here you can see the name of the stream.
4. Click here to regenerate the a new stream code.
5. Select from the drop down list the gap time for appending the recordings.
6. Select from the drop down list the auto record time limit. You can select a limited recording time or no limit.
7. Select from the drop down list if you want to split long recordings. You can select the period of time after which the recording is sliced.
8. Click here to save selected details.
General information
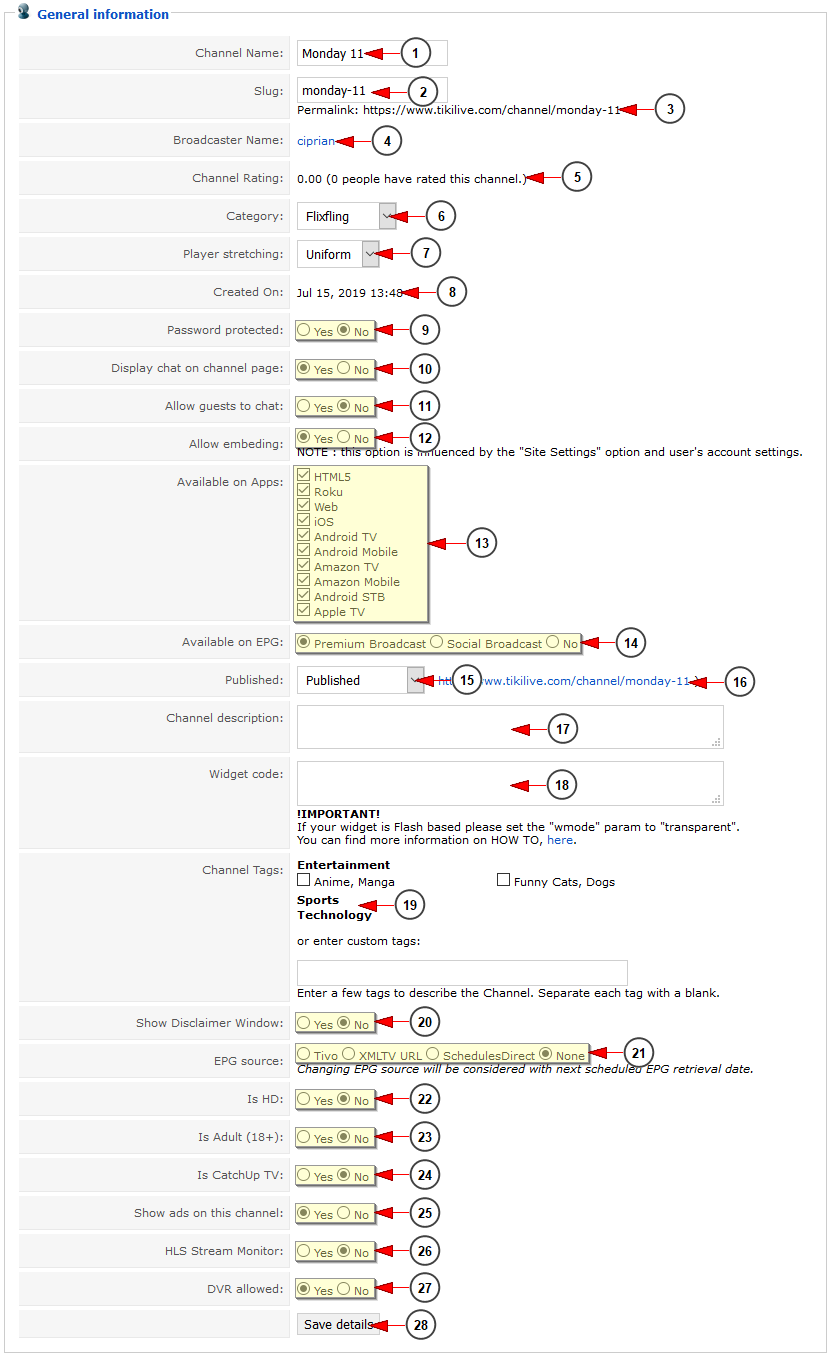
1. Here you can see and edit the name of the channel.
2. Here you can see and edit the slug of the channel – this is used to generate the unique link for the channel.
3. Here you can see the link of the channel.
4. Here you can view the username of the user who owns the channel; by clicking on it you can edit the user account.
5. Here you can view the ratings for this channel and how many people have rated it.
6. Here you can view the category to which this channel belongs. From the drop-down menu you can select another category for this channel.
7. From this drop-down menu you can select the player stretching:
– none
– exact fit
– uniform
– fill
8. Here you can see the date when the channel was created.
9. Check the YES radio button if you want to add a password for this channel – the viewers will need to enter the password in order to access the channel or the NO radio button if you don’t want to add a password for the channel.
10. Check the YES radio button if you want to enable the chat on the channel page or the NO radio button if you don’t want to enable the chat on the channel page.
11. Check the YES radio button if you want to allow guests to post messages on the channel chat or the NO radio button if you don’t want to allow guests to post messages on the channel chat.
12. Check the YES radio button if you want to allow embedding or the NO radio button if you don’t want to allow embedding.
13. Check the YES radio button if you want the channel to be available on the desired application: HTML5, Roku, Web, iOS, Android TV, Android Mobile, Amazon TV, Amazon Mobile, Android STB, Apple TV
13. From here you can select where the channel will be published on the EPG: on Premium Broadcast tab, on Social Broadcast tab, not available on EPG
15. From here you can publish the channel or make it as unlisted.
Note: Unlisted channels will not be published on the website. They can only be accessed using the channel URL.
16. Here you can view the URL to the channel page.
17. Here you can view and edit the description of this channel.
18. Insert here the widget code of a video you want to display on the channel page. Below you can see widget code preview in the channel page.
Note: make sure when you copy paste the embed code, you check the size of the video first so that it doesn’t affect the display on the channel page of your website.
19. Here you can see and edit the tags for this channel.
20. Select the YES radio button if you want to show disclaimer window on the channel page or select the NO radio button if you don’t want to show disclaimer window on the channel page.
21. Select the source from where you want to get the EPG for this channel.
Note: this is a custom feature that will import the EPG from schedules Direct and you need to contact our development team as this feature is installed only on request.
22. Select the YES radio button if the stream on the channel is HD quality.
23. Select the YES radio button if the stream on the channel is adult content.
24. Select the YES radio button if the stream on the channel is CatchUp TV.
Note: CatchUP TV here at TikiLIVE is a series of live channels produced from various content available on the public domain. We organize these series and episodes into a a channel to provide a lean-back TV-like experience.
25. Select the YES radio button if you want to show ads on the stream of this channel.
26. Select the YES radio button if you want to use the HLS Stream Monitor tool to be informed when there are issues on the stream of this channel.
27. Select the YES radio button if you want to allow DVR on this channel.
28. Click here to save the details you have entered.
CDN Settings
This section is displayed only for users who have purchased and installed CDN Module.
Note: In order to publish your channel through CDN, CDN status must be enabled from Site Settings page.

1. Check this box to publish the channel through live streaming content delivery network.
Note: once you check the box to publish the channel through CDN, the HLS URI will be displayed.
2. Here you can see the HLS URI for this stream
3. Click here to save the details.
Note: streams might not be published instantly; CDN may take some time to get them published.
4. From here you can select if you want to set the VODs to play through CDN by default – this setting will be applied only to the videos assigned to this channel
Premium Channel settings
Note: these settings are related to optional module.
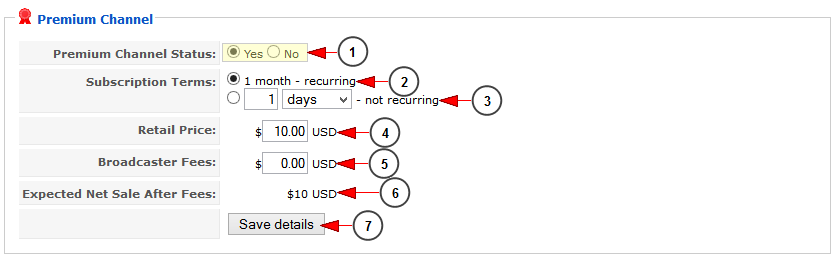
1. Check the YES radio button if you want this channel to be a Premium Channel or the NO radio button if you don’t want this channel to be a Premium Channel.
2. Check the radio button if you want to set the subscription terms as recurring every month.
3. Check this radio button and select a number of days from the drop down list – not recurring.
4. Insert a retail price for your channel.
5. Insert here the broadcaster fees.
Note: After inserting the retail price and the broadcaster fees, the expected net sale will be automatically calculated.
6. Here you can see the expected net sale amount.
7. Click here to save the details you selected.
Viewers information
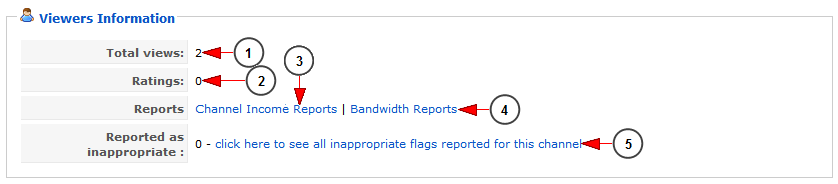
1. Here you can see the number of total channels views.
2. Here you can see how many persons have rated this channel.
3. Click here to view the channel income reports.
4. Click here to view the bandwidth reports.
5. Click on the link to see all inappropriate flags reported for the channel.
Channel tickets
Note: these settings are related to Social Broadcasters optional module.
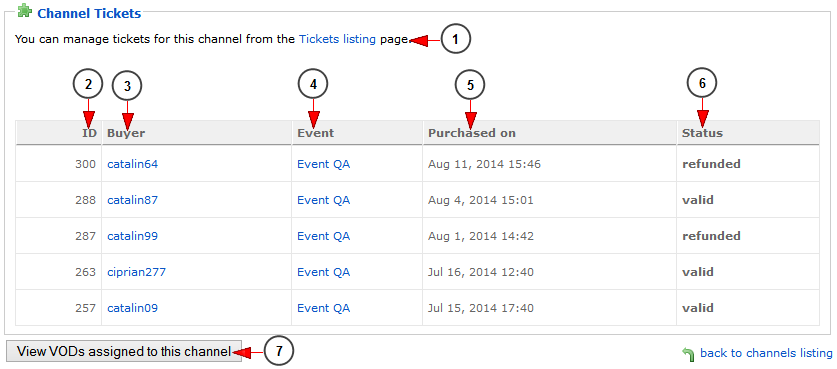
1. Click here to go Tickets Listing page.
2. Here you can view the transaction ID.
3. Here you can see the name of the viewer who bought the ticket. Click on it and you will be redirected to the Edit user page.
4. Here you can see the name of the events to which the tickets were purchased.
5. Here you can see the date when the ticket was purchased
6. Here you can see the status of the ticket: valid or refunded.
7. Click on to view all videos assigned to the channel.
Channel Disabled
If a channel is disabled, then the Access Status will look like:

1. Here you can view that this channel is disabled.
2. Click here to enable this channel.
Widget Code Preview
Widgets are simple, fun, and useful applications that can be embedded on a webpage, blog, or social media page. Chances are you’ve already seen widgets, and recognize them, even if you don’t know them by name. Ever seen a quiz or a game on a friend’s Facebook wall? A YouTube playlist on your friend’s page? Then chances are you’ve seen a widget before. Widgets are great because they allow you to easily create customized content with no coding knowledge necessary. If you can type text and choose colors or images, you can make a personalized widget in less than five minutes
Below you can view the widget implemented into a channel page:
