Note: If you do not see the Branding link in your DashBoard, then you will need to do the following steps:
1. Upgrade to a Premium Account.
2. Contact the website administrator (using contact form) and ask him to enable branding of your radio player.
Important: the administrator will have to enable the permission allow branding from the Group permissions page.
Once the user has access to the Branding section he has three options:
- customize the watermark logo of the radio player
- set the watermark logo as the default radio player
- leave the radio player without any watermark logo
Logged in as a user, in Branding page you will be able to customize the watermark that will be displayed on the player from your radio channel. In order to do that you will need to click on Account Info button from the left side of the DashBoard area:
After the Account Info menu tab opens, the user will have to click on the Branding link:
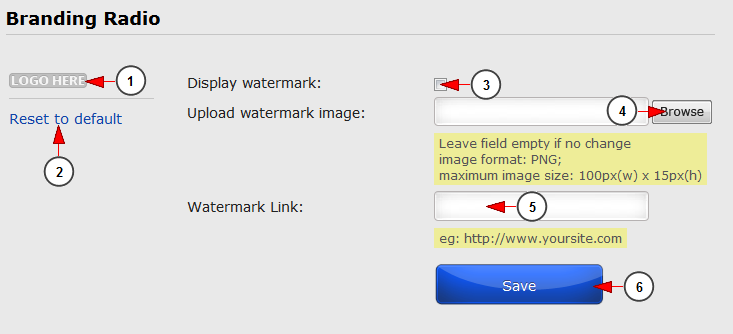
This is how the Branding page looks like and below we will explain each field:
1. Here you can view the actual watermark that is displayed into the player
2. Click here to reset the watermark to default
3. Check this box if you want to display the watermark on the player
Notes:
– It’s mandatory to check this box if your want the watermark logo to be displayed on the radio player; otherwise the logo won’t be uploaded. When you change the watermark logo, you need to clear the cache and cookies for the changes take effect.
– If you don’t upload a watermark and select to display it on the website or if you reset the watermark to the default one, the website watermark logo will be displayed on the players.
4. Click here to upload your watermark
5. Here you will enter the URL where the watermark will link
6. Click here to save the changes on branding the player


