WordPress plugins allow you to add new features to your network that don’t come standard with the default installation.
To view the plugins installed on the platform, go to Plugins chapter, in Network Admin area and click on the Installed Plugins link:
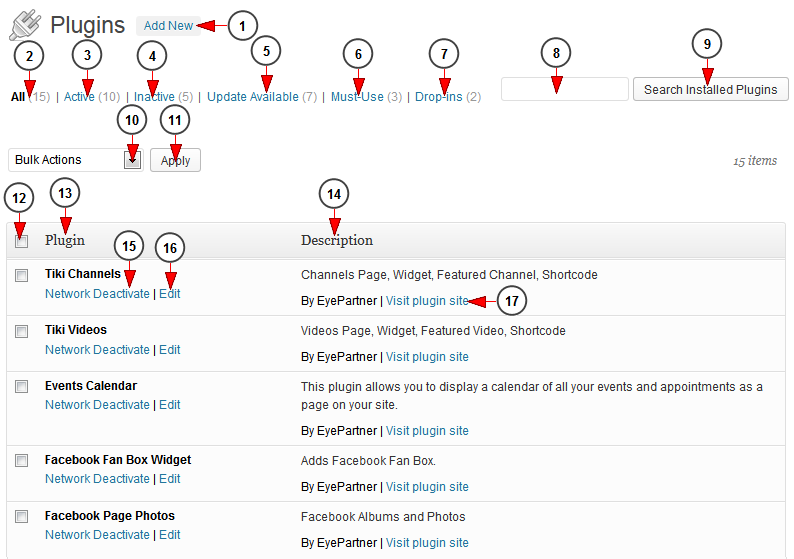
The Installed Plugins page will open as you can see in the following picture:
1. Click here to add a new plugin
2. Click here to view all the installed plugins (you can see the number of plugins in brackets)
3. Click here to view all the active plugins (you can see the number of plugins in brackets)
4. Click here to view all the inactive plugins (you can see the number of plugins in brackets)
5. Click here to view all the plugins that can be updated (you can see the number of plugins in brackets)
6. Click here to view all the plugins that you must use (you can see the number of plugins in brackets). These files are executed automatically
7. Click here to view all the drop-ins plugins (you can see the number of plugins in brackets). These are advanced plugins that replace WordPress functionality when present
8. Type here the name of a plugin you want to search
9. Click here to search the plugin
10. Click here to choose an action for the selected plugins: activate, update or delete
11. Click here to apply the action to the selected plugins
12. Click here to select the plugins you want activate, update or delete
13. In this column you can see the name of the plugin
14. Here you can view the description of the plugin
15. Click here to deactivate the plugin on the network
16. Click here to edit the plugin details
17. Click here to visit the plugin site
Note: our team can help you customize all 3rd party plugins, or resolve any issues for modified supported plugins, on billable terms


