You can add a new announcement on your website. In order to do that you will have to click on add a new announcement link from the Announcements area.
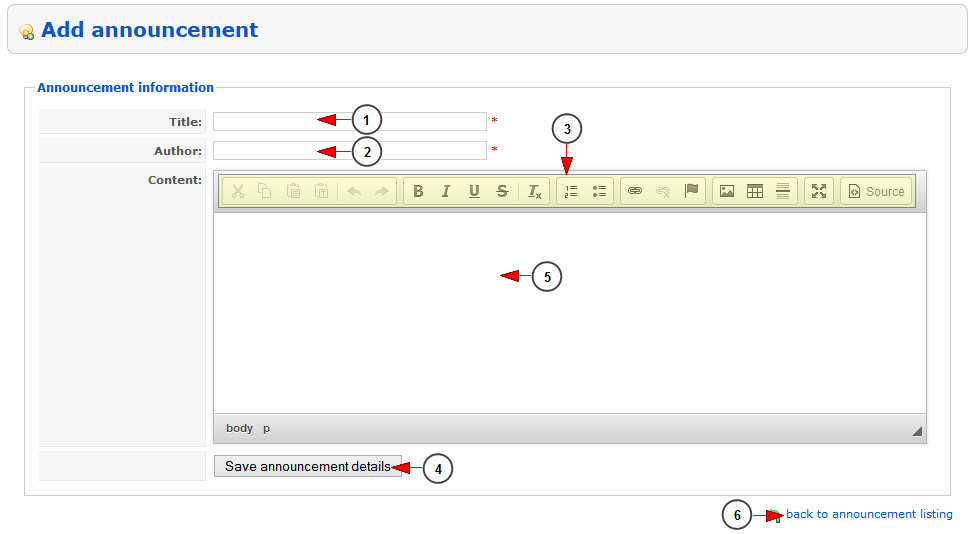
1. Enter here the title of the announcement.
2. Enter here the name of the announcement author.
3. This is the toolbox menu which you can use to adjust the content of the announcement.
4. Enter the announcement content text in this area.
5. Click here to save the new announcement.
6. Click here to go back to Announcements listing.
Here you can view each function from the toolbox menu explained:
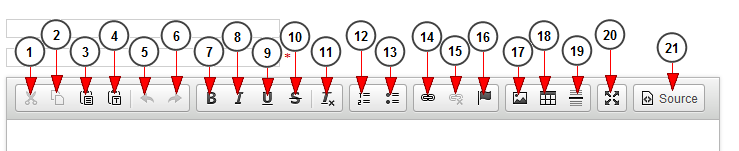
1. Click here to Cut the selected text.
2. Click here to Copy the selected text.
3. Click here to Paste the content.
4. Click here to Paste as plain text the content.
5. Click here to Undo your last action.
6. Click here to Redo your action.
7. Click here to set as Bold the selected text.
8. Click here to set as Italic the selected text.
9. Click here to set as Underline the selected text.
10. Click here to set as Strike Through the selected text.
11. Click here to remove the text format.
12. Click here to insert or remove numbered list into the page.
13. Click here to insert or remove bulleted list into the page.
14. Click here to insert or edit a link.
15. Click here to remove the link from the selected text.
16. Click here to insert or edit an anchor.
17. Click here to insert or edit an image.
18. Click here to insert or edit a table.
19. Click here to insert a horizontal line.
20. click here to maximize the text editor.
21. Click here to view the source code of the page.
Image properties
If you want to add an image or edit the properties of an existing image, click on insert/edit image button and the following pop-up window will open:
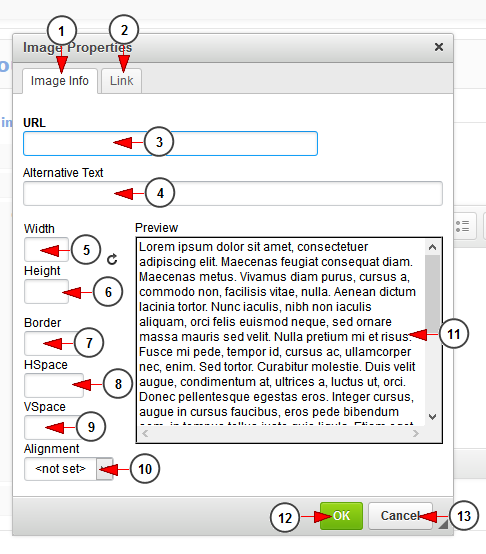
1. Click here to edit the image info details.
2. Click here to edit the image link details.
3. Enter here the URL of the image.
Note: you can upload the image into some free hosting websites (e.g.: www.freeimagehosting.net , www.postimage.org , imageshack.us , tinypic.com )
In case you add it on ftp you need to add the image path (e.g: public_html/site/image_name.jpg).
4. Enter here the alternative text of the image (this is optional but helps you with SEO).
5. Here you can adjust the width of the image.
6. Here you can adjust the height of the image.
7. Enter here the border of the image.
8. Here you can adjust the HSpace of the image.
9. Here you can adjust the VSpace of the image.
10. Select the image alignment from the drop-down menu.
11. Here you can see the preview of the image.
12. Click here to save the details.
13. Click here to cancel editing the image properties details.
Image properties – edit link details
If you want you can edit the link details of an image and the following pop-up window will open:
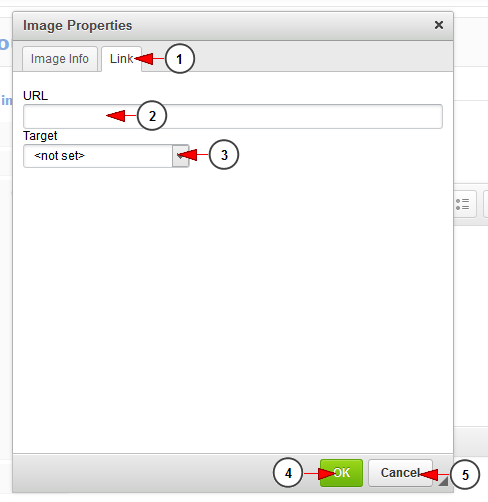
1. Click here to view and edit the Link for the image.
2. Enter here the URL of the image.
3. From this drop-down menu select the target window of the URL.
4. Click here to save the details.
5. Click here to cancel editing the image properties details.
Insert/Edit link
You can choose the link type as well as set the link protocol and URL:
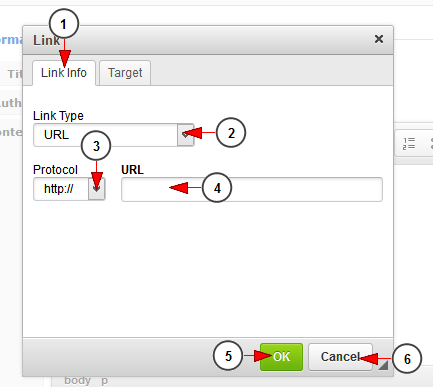
1. Click here to view the Link info details.
2. Select from the drop down the link type: URL, link to anchor in the text or e-mail.
3. Select from the drop down the communication protocol used with the web address. You can choose between the following options: http://, https://, ftp://, news://, or <other>.
4. Insert here the URL – the web address of the resource that the link is pointing to. It may be located on the same server as the web site you are currently in or on an external server.
5. Click here to save the details.
6. Click here to cancel the link details.
Link Target
The Target tab is only available for the URL link type. It specifies the location where the link will open after you click it. By default the target of the URL is not set and the link will open in the same browser window or tab as the document.
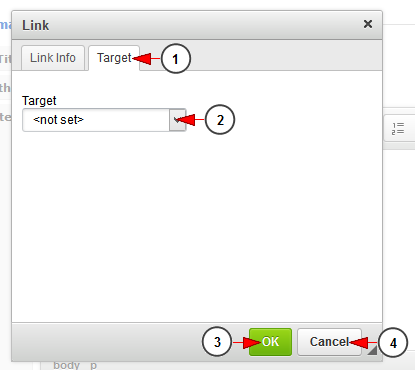
1. Click here to edit the target of the link.
2. Select where you want the link to open: pop up window, new window, topmost window, same window, parent window.
Note: The target details and features will be displayed after you selected the target at no.2.
3. Click here to save the details.
4. Click here to cancel editing the link target details.
Table properties
You can insert new table into the page:

1. From here you can set the number of rows of the table.
2. From here you can set the number of columns of the table.
3. Select the table Headers properties.
2. From here you can set the width and height of the table.
4. From here you can set the border size of the table.
5. Select from the drop-down menu the alignment of the table.
6. Insert here the width of the table.
7. Insert here the height of the table.
8. From there you can set the cell spacing.
9. From there you can set the cell padding.
10. Insert here a caption for the table.
11. Insert here a summary for the table.
12. Click here to save the details.
13. Click here to cancel editing the table details.