Note: this section is related to Pay Per View optional module
Logged in your admin account, click on Refunds link, under Pay Per View menu:
Here you can view the refund requests made on the system:
1. Check this radio button if you want to view the report for a pre-selected period of time
2. Select from the drop down list the desired period of time: current day/week/month/year or previous day/week/month/year
3. Check this radio button if you want to view the report for an exact period of time
4.Click here to open the calendar and select the start date for reports
5. Click here to open the calendar and select the end date for reports
6. From this drop-down menu you can select the buyer of the tickets you want to view the refunds report for
7. From this drop-down menu you can select the broadcaster who sold the tickets you want to view the refunds report for
8. From this drop-down menu you can select the media type for which you want to view the reports: events or videos
9. Click here to view the reports for the selected period of time
Refund requests report
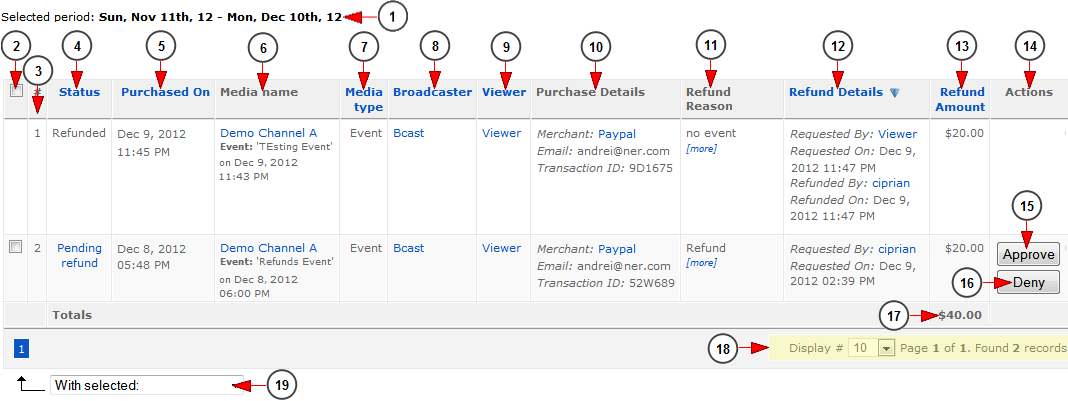
1. Here you can see the selected period of time for which the refunds report is listed
2. Check this radio button to select the requests you want to approve or deny request
3. Here you can view the listing number of the transaction
4. Here you can view the status of the request: pending refund or refunded
5. Here you can view the time of the transaction
6. Here you can view the name of the media and details on the event or video
7. Here you can view the type of the media
8. Here you can view the name of the broadcaster that sold the ticket; by clicking on it you can edit the user account
9. Here you can view the name of the user that bought the ticket; by clicking on it you can edit the user account
10. Here you can view details of the transaction: the merchant’s name, the email address of the buyer and the transaction ID
11. Here you can view the refund reason
12. Here you can see the refund details: the name and date of the refund request and the name and date when administrator approved the request
13. Here you can view the refund amount
14. Here you can see the actions area
15. Click here to approve the refund request
Note: Admin will be the one to do the actual payment of refunds. He will record his actions that must be done outside the system in dashboard only for reporting reference. No actual payment is done from the platform
16. Click here to deny the refund request
Note: An email will be sent to the broadcaster and viewer informing if the admin has accepted or denied the request
17. Here you can view the total amount of refund transaction
18. Here you can view the pagination index and you can select how many tickets will be listed on page
19. From this drop-down menu you can choose to approve or deny the refund request
Calendar
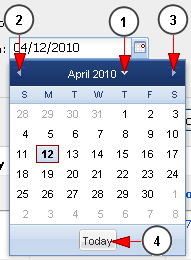
If you click on the calendar icon, the pop-up calendar will open and you will be able to select the date:
1. Click here to view the month and year part and select the desired month and year
2. Click here to go to previous month
3. Click here to go to next month
4. Click here to go to current day
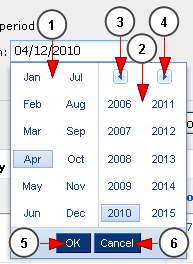
If you click on the arrow from previous point 1 (the arrow near year), you will be able to select the month and the year for the reports period:
1. From here you can select the month
2. From here you can select the year
3. Click here to view the years before 2006
4. Click here to view the years after 2015
5. Click here to select the highlighted month and year
6. Click here to close the pop-up calendar
Important:
Once refund is approved, you need to log in your Merchant account and complete the refund transaction.
Click here to see more details on refunds from Authorize merchant.
Click here to see more details on refunds from Authorize merchant.


