After the system administrator has logged into his admin area, he will have to click on Languages Editor link, under CMS chapter:

This is how the Languages Editor page looks like:
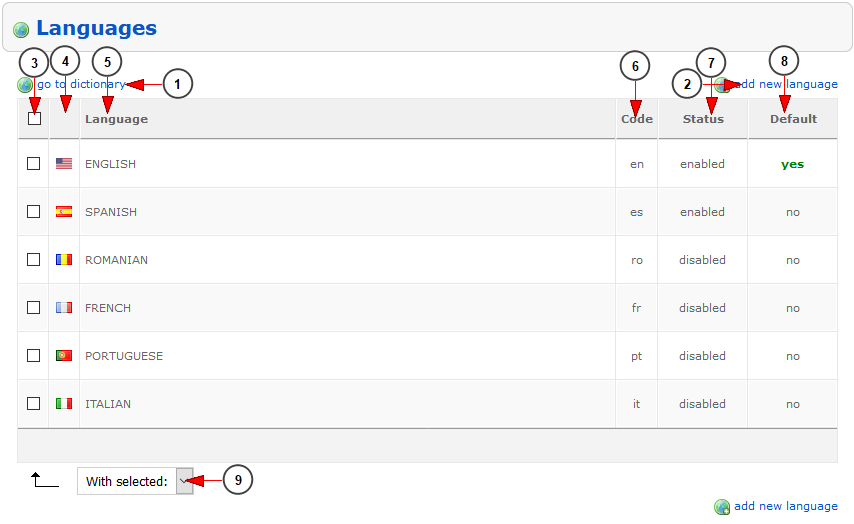
1. Click here to go to Dictionary editor page
2. Click here to add a new language for your platfrom
3. Check this box if you plan to delete, enable, disable or set as default the language
4. Here you can view the flag icon for this language
5. Here you can view the name of the language
6. Here you can see the site code for each language
7. Here you can see if the language is enabled or disabled for the website
8. Here you can see the which language is used as the default language for the website
Notes:
- The green yes text is informing you that this language is the default language set for your solution
- The no text is informing you that this language is not the default language for your solution
9. From this drop-down you can choose, for the selected languages, to do the following action: delete, enable for website, enable for STB, disable for website, disable for STB, set as default for website, set as default for STB
Add a new language
A pop-up window will open from where you can add the details of the new language:

1. Click here to close the pop up window
2. Select from the drop-down menu the new language that you want to add
3. Check this box if you want to translate all keys of the new language using Google translate
Note: The translate process may take up to 10 minutes
4. Click here to save and add the new language into your solution
After you have selected the desired language, on the pop-up, 2 new fields will appear, like in the following image:

1. Select from the drop-down menu the new language that you want to add
2. Here you will see the site code for this language
3. Here you can view the flag icon for this language
4. Check this box if you want to translate all keys of the new language using Google translate
Note: The translate process may take up to 10 minutes
5. Click here to save and add the new language into your solution
6. Click here to close this pop-up window without saving the language
After you have added a new language, it will appear on the Languages list but the status of the new language will be disabled. You will need to enable the language (by checking the corresponding check box and selecting the enable option) before having the possibility to edit the dictionary keys description of that language
Note: You can translate maximum 2 languages per day using Google Translate API. If you try to translate more than 2 languages per day the following message will appear:

If you want to translate the third language, take note it will copy the keys from the default language of the system