Logged in your administrator account, click on the Support Tickets in Support chapter, page in order to view the page:

The Support Tickets page will open, as you can see in the following picture:
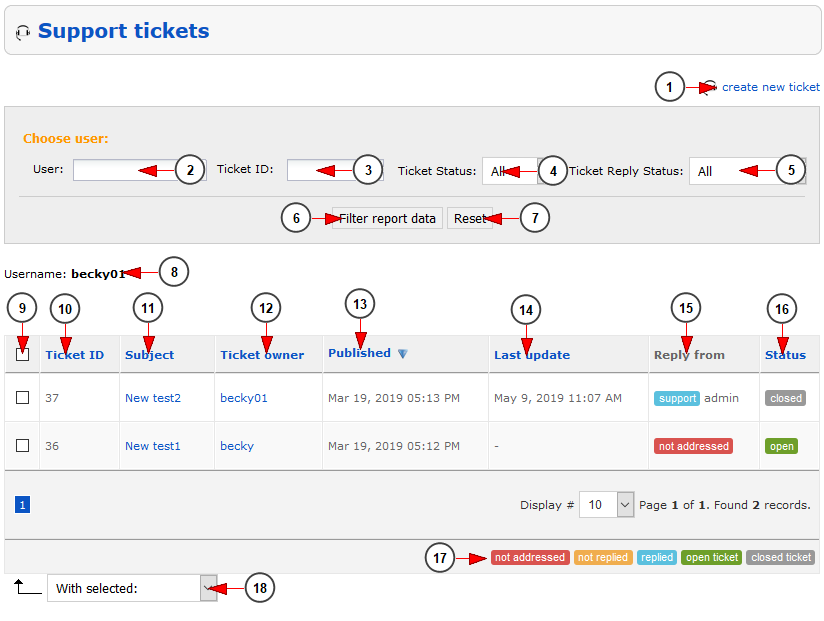
1. Click here to create a new support ticket into the user’s account
2. From here you can select the user for which you can filter the support tickets
3. Enter here the ID of the ticket that you want to search
4. Select from the drop-down menu the status of the tickets that you want to filter: open, closed, all
5. Select from the drop-down menu the reply status of the tickets that you want to filter:Not addressed, Not replied, Replied
6. Click here to perform the filter of the support tickets based on the filters selected above
7. Click here to reset the search filters and view all the support tickets
8. Here you can see the user for which the support tickets are filtered
9. Check this box related to the ticket that you change the status to Open or Closed
10. Here you can view the ID of the ticket
11. Here you can view the subject of the ticket
12. Here you can view the owner of the ticket
13. Here you can view the date when the ticket was published
14. Here you can view the date when the ticket was updated last time
15. Here you can view the last reply that was made on the ticket:
- not addressed – the ticket was submitted by the user and there was no rely from administrators
- not replied – the user posted a reply into the ticket and there was no reply from administrator
- replied – the admin has posted a reply fro the user in the ticket
Note: Based on the last reply status you can quickly view the support tickets that needs to be addressed.
16. Here you can view the status of the ticket: open, closed
17. Here you can view the legend of the support ticket status:
- not addressed – the ticket was submitted by the user and there was no rely from administrators
- not replied – the user posted a reply into the ticket and there was no reply from administrator
- replied – the admin has posted a reply fro the user in the ticket
- open – the ticket is open and the admin or users can reply into the ticket
- closed – the ticket is closed and there is no option for the user to post replies into it
18. Select from the drop-down menu the option to Close or Open the selected support tickets
Ticket Details

1. Click here to go back to support tickets page.
2. Here you can see the title of the ticket.
3. Here you can see the user name of the the ticket owner.
4. Here you can see the message sent by the user.
5. Here you can see type of the ticket – the category to which the user assigned his question.
6. Here you can see the technical details of the reported issue.
7. Click here to edit the log.
8. Click here to see the uploaded file.
9. Insert here the text for your log.
10. Click here to browse a file in your computer in order to upload it.
Note: you upload the following file types mp3, wav, flac, m4a, ogg, wma, jpg, jpeg, gif, png, bmp, psd, mpg, mpeg, mov, wmv, flv, avi, mkv, mp4, 3gp, ogg, f4v, m4v, ogv. with a size under 90 MB.
11. Check the radio button according to what type of log you want to insert: internal or external.
12. Click this button to add a new log.
Create new Support ticket on User’s account
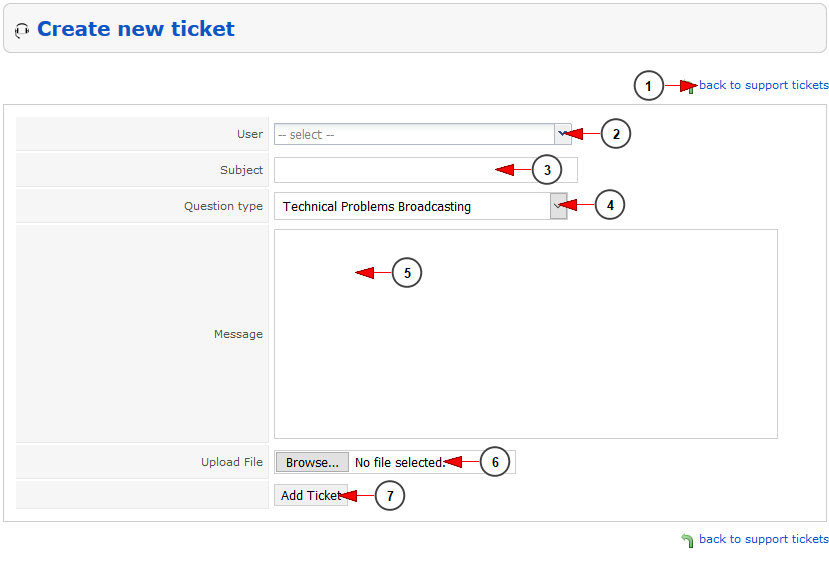
1. Click here to navigate back to the list of support tickets
2. From here you can select the user on which account you want to create the new support ticket; once you will start typing the username the drop-down will show you the users that have that username
3. Enter here the subject for the support ticket that you want to create
4. Select from the drop-down menu the type of the question that you want to set for the support ticket
5. Enter here the message of the support ticket that you want to create
6. Click here if you want to upload a file into the support ticket
7. Click here to add the support ticket on user’s account